Programming

Converting Float/Single To Network Order And Back In C#

I’ve seen a few posts & threads around the Internet about network order (aka big-endian) and floating point values in C#. First – all binary values are affected by the underlying architecture – this includes floating point values. It’s akin to Hebrew – all the words are written right-to-left, not just some. Now that we’ve cleared that up, I’m sure you’re wondering just how we reverse the ‘endianness’ of floats given that IPAddress only lets you convert ints.

A 32bit int is merely 32 bits of data. We just label it as an ‘int’ and always interpret it thus. What we need to do, is take a 32bit float and pretend it’s an int, get C# to convert it, then send it down the network pipe. The receiver can then fix the endianness and read it as a float. I’ve written some code that does just that:

/// <summary>
/// Convert a float to network order
/// </summary>
/// <param name="host">Float to convert</param>
/// <returns>Float in network order</returns>
public static byte[] HostToNetworkOrder(float host)
{
    byte[] bytes = BitConverter.GetBytes(host);

    if (BitConverter.IsLittleEndian)
        Array.Reverse(bytes);

    return bytes;
}

/// <summary>
/// Convert a float to host order
/// </summary>
/// <param name="network">Float to convert</param>
/// <returns>Float in host order</returns>
public static float NetworkToHostOrder(int network)
{
    byte[] bytes = BitConverter.GetBytes(network);

    if (BitConverter.IsLittleEndian)
        Array.Reverse(bytes);

    return BitConverter.ToSingle(bytes, 0);
}

Remember Network Order is always big-endian. .NET itself can be big-endian or little-endian depending on the underlying architecture. For this reason we always check if we even need to perform a conversion by checking if we’re running on a little-endian system. As an aside Java is always big-endian, regardless of the underlying architecture it’s running on.

Posted by Dan in C#, Guides, 1 comment

Notify Property Weaver

I’ve found MVVM to require somewhat excessive amounts of boilerplate code, and as far as I’m concerned if you have a lot of boilerplate (aka. repeated) code then you’re doing it wrong. There’s a few articles out there on using a little IL weaving to automatically provide notifications for the INotifyPropertyChanged interface. This dramatically reduces the amount of boilerplate you have to write, and dramatically increases readability. Simon Cropp has released the best solution by far – a NuGet package that you can integrate into your app and forget about.

The solution works with Silverlight 3.5 and .NET 3.5 onwards. Most importantly it works well with Windows Phone 7 – something many other solutions don’t always work particularly well with. The solution even works automatically with dependencies – so if one property changes as a result of another changing, the notifications will automatically be fired for both properties. Very, very clever.

Go give it a go!

Posted by Dan in C#, Windows Phone, 1 comment

Cocos2D Sound in Android Tutorial

Update: This code is using an outdated version of the Cocos2D port. It’ll still work if you use the sample download linked at the end – but it’s using outdated API calls. Unfortunately I don’t have time to update the tutorial to the new release of Cocos2D. Sorry guys 🙁

Cocos2D for Android provides a very rudimentary sound system for playing background music, and simple sound effects. For the vast majority of games, this is plenty. However, if you have more advanced requirements you may need to look into either rolling out your own sound engine or sourcing something more complete elsewhere.

Overview

The Cocos2D ‘SoundEngine’ class provides all of the functionality you’ll need. It groups audio into two main groups: ‘Sound’ and ‘Effect’. Effects are the explosions, jump sounds, and other general effects you have within games. Sound is the background music and is the only audio type that can be paused and resumed. Sound effects should be kept under 5 seconds long, and ideally they should be under 3 seconds.

Android supports a wide range of different audio formats, you can view a complete list here. However, I’ve found that the SoundEngine doesn’t necessarily support all of these formats – so please do test your audio on a real device, preferably a few.

Let’s start coding!

Create a new Android project in your IDE of choice, IntelliJ Idea is my favourite, but Eclipse is very good also. You also need to download the latest source code for cocos2d-android-1, the downloadable jar doesn’t include the SoundEngine code. Include the source into your project – this also has the added advantage that you can poke around the code to see how everything works.

Also you need to add the two audio files in this zip, and put them in the ‘raw’ folder within the ‘resources’ folder. If you don’t have a raw folder, create it.

Before we get into any real coding, we’ll need to create a very rudimentary GUI to allow us to interact with the sound system. We’ll add two buttons to the main layout, one to play some background music and another to play a single sound effect:

<?xml version="1.0" encoding="utf-8"?>
<LinearLayout xmlns:android="http://schemas.android.com/apk/res/android"
    android:orientation="vertical"
    android:layout_width="fill_parent"
    android:layout_height="fill_parent"
    >
    <Button
        android:layout_height="wrap_content"
        android:layout_width="wrap_content"
        android:layout_gravity="center_horizontal"
        android:layout_marginTop="10dp"
        android:text="BG Music Toggle"
        android:onClick="bgMusicClicked" />

    <Button
        android:layout_height="wrap_content"
        android:layout_width="wrap_content"
        android:layout_gravity="center_horizontal"
        android:layout_marginTop="10dp"
        android:text="Play Sound Effect"
        android:onClick="sfxClicked" />
</LinearLayout>
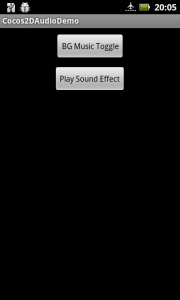
Using SoundEngine

The SoundEngine offers functionality to pre-load audio, this is critical to ensure sound effects are played instantly. It also means we can use compressed audio formats such as mp3, without slowing down our game. Add the following field to the top of the main activity:

private Context _cocos2dContext;

Next add the following code to the onCreate() method:

_cocos2dContext = this;

// Preload background music
SoundEngine.sharedEngine().preloadSound(_cocos2dContext, R.raw.background_music_aac);

// Preload sound effect
SoundEngine.sharedEngine().preloadEffect(_cocos2dContext, R.raw.pew_pew_lei);

This code sets the context we’ll use for playing audio, and preloads the background audio, and the sound effect. We set the context to the current activity; this is because we’re not actually using Cocos2D in this demo. In your actual games you would use CCDirector.sharedDirector().getActivity() instead of this.
Now, create the event handlers for the two buttons we created:

public void bgMusicClicked(View button)
{
    // Play the background music
    SoundEngine.sharedEngine().playSound(_cocos2dContext, R.raw.background_music_aac, true);
}

public void sfxClicked(View button)
{
    // Play the sound effect
    SoundEngine.sharedEngine().playEffect(_cocos2dContext, R.raw.pew_pew_lei);
}

Give it a test!

It won’t stop playing!

OK I may have let you walk into this one – the background music plays even when the activity is ‘closed’ or otherwise not being used by the user. This is very handy if you’re making an mp3 player, but not so useful when making a game. Fortunately we can fix this problem by hooking into a few events Android offers. As a refresher, here is the Activity Lifecycle in Android:
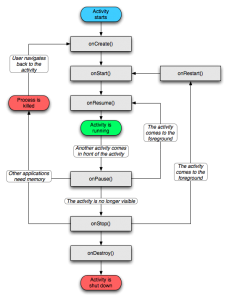
We need to cater for the activity being obscured by another activity, being hidden, and being closed down. The onResume, onPause, and onDestroy methods should be plenty for our needs. In onResume we’ll need to resume playback of the background sound if it was playing. onPause will pause the sound (if any) ready for resuming. When onDestroy is called we’ll close everything down and free up any applicable resources.

First, add the following fields to the activity class:

private boolean _soundPlaying = false;
private boolean _soundPaused = false;
private boolean _resumeSound = false;

We need to populate these fields as necessary when the user wants to play / pause the background music. Replace the bgMusicClicked method with:

public void bgMusicClicked(View button)
{
    // If we haven't started playing the sound - play it!
    if (!_soundPlaying)
    {
        SoundEngine.sharedEngine().playSound(_cocos2dContext, R.raw.background_music_aac, true);
        _soundPlaying = true;
    }
    else
    {
        // We've loaded the sound, now it's just a case of pausing / resuming
        if (!_soundPaused)
        {
            SoundEngine.sharedEngine().pauseSound();
            _soundPaused = true;
        }
        else
        {
            SoundEngine.sharedEngine().resumeSound();
            _soundPaused = false;
        }
    }
}

Now we only play the sound once, rather than starting fresh each time. We pause / resume the sound depending on whether it’s currently playing or not – your typical toggle pattern.
Now we’ll create the onPause handler:

@Override
public void onPause()
{
    super.onPause();

    // If the sound is loaded and not paused, pause it - but flag that we want it resumed
    if (_soundPlaying && !_soundPaused)
    {
        SoundEngine.sharedEngine().pauseSound();
        _soundPaused = true;
        _resumeSound = true;
    }
    else
        _resumeSound = false; // No sound playing, don't resume
}

In this method we check if the sound is playing, and if it is – whether it’s paused or not. If the sound is playing but it’s not paused, we pause it and request that it’s resumed at the earliest opportunity. If the sound isn’t playing or it’s paused, then we request that the sound isn’t resumed when the activity is.

Now it’s time for the onResume method:

@Override
public void onResume()
{
    super.onResume();

    // Resume playing sound only if it's loaded, paused and we want to resume it
    if (_soundPlaying && _soundPaused && _resumeSound)
    {
        SoundEngine.sharedEngine().resumeSound();
        _soundPaused = false;
    }
}

We check if the sound is playing, it’s paused, and a request is pending to resume the sound. If all of this is true (phew, that’s a lot of checking!) we resume the sound.

At this point we can run the app, and the audio will be handled properly. The user won’t be irritated by music playing when it shouldn’t, and our game can resume seamlessly when the user comes back. However, we haven’t yet implemented the onDestroy method – we never clean everything up.

Cleaning up our mess

Strictly speaking, cleaning up isn’t necessary in this app. Android will automatically reclaim the consumed resources when the app is destroyed. However, it’s always good to clean everything up anyway, if only so you know how to do it when it really is important. Add the following destroy method:

@Override
public void onDestroy()
{
    super.onDestroy();

    // Clean everything up
    SoundEngine.sharedEngine().realesAllSounds();
    SoundEngine.sharedEngine().realesAllEffects();

    // Completely shut down the sound system
    SoundEngine.purgeSharedEngine();
}

First we release all of the preloaded sounds and effects. You can selectively release individual sounds and effects if you need to. If your game is made up of multiple scenes with different audio in each, it’s a very good idea to release the audio you’re not using to save on memory.

Finally we shut down the sound engine itself. This isn’t really necessary, but it’s here for you to see how it can be done. If you have completely different areas in your game, you could feasibly want to have no trace of the SoundEngine between those scenes since the SoundEngine is a singleton by design.

And we’re done!

And that’s it; you now know everything you need to add basic audio to your Android Cocos2D games.

You can download the sample project here.

If you want more Cocos2D, don’t forget to check out the basic tutorial series starting here.

Posted by Dan in Android, Java, Tutorials, 3 comments

Enum in Java with int conversion

If you’ve found this post, chances are you want to convert from an enum to an int, or alternatively from an int to an enum in Java. Well… you can’t. Java has the most robust implementation of the ‘enum pattern’ of any language, in essence enums are a class that can only be instantiated once. This makes them ideal as singletons by the way…

Anyway, since enums are a class, you need to provide the int functionality yourself. For my example, I’m going to be making a ‘difficulty’ enum which should be very familiar with anyone making games for Android. First declare your enum:

public enum Difficulty
{
    EASY(0),
    MEDIUM(1),
    HARD(2);

    /**
     * Value for this difficulty
     */
    public final int Value;

    private Difficulty(int value)
    {
        Value = value;
    }
}

This should be fairly familiar to you if you’ve worked with Java enums for any length of time. Each enum is effectively an instance of itself, so we can pass values to the constructor. We store the value in a final field (enums are by definition immutable – don’t go breaking this without good reason!) for future retrieval. Ideally the value should be accessed by a getter rather than directly, but I think in this case it makes more sense to making it a public field. The user can’t change it, and we don’t need any code to run on access; so I think a getter would just reduce performance and make consumption that little bit more tedious.

Now we need to add the important part, the conversion from int to the enum itself:

// Mapping difficulty to difficulty id
private static final Map<Integer, Difficulty> _map = new HashMap<Integer, Difficulty>();
static
{
    for (Difficulty difficulty : Difficulty.values())
        _map.put(difficulty.Value, difficulty);
}

/**
 * Get difficulty from value
 * @param value Value
 * @return Difficulty
 */
public static Difficulty from(int value)
{
    return _map.get(value);
}

So what are we doing here, exactly? Well we create a map that will be our lookup table, we do this rather than a switch statement to minimise long-term maintenance. If someone added an extra enumeration in the future, they may forget to update the switch statement – and this error won’t be picked up until runtime, and even then it may appear as incorrect behaviour rather than throwing an exception. After we’ve created the map, we populate it automatically by looping through all of the enums and adding them and their value to the map.

So there you have it, the proper pattern for adding int values to an enumeration. The code in full is below:

public enum Difficulty
{
    EASY(0),
    MEDIUM(1),
    HARD(2);

    /**
     * Value for this difficulty
     */
    public final int Value;

    private Difficulty(int value)
    {
        Value = value;
    }

    // Mapping difficulty to difficulty id
    private static final Map<Integer, Difficulty> _map = new HashMap<Integer, Difficulty>();
    static
    {
        for (Difficulty difficulty : Difficulty.values())
            _map.put(difficulty.Value, difficulty);
    }

    /**
     * Get difficulty from value
     * @param value Value
     * @return Difficulty
     */
    public static Difficulty from(int value)
    {
        return _map.get(value);
    }
}

Bonus

OK I can’t leave you with just this without providing a little ‘from here’ info. Switching on an enum in Java isn’t ideal since you can add all sorts of information to the enum to minimise the necessity for a glorified if..elseif statement. For this difficulty example, we could add a ‘multiplier’ field that allows code to automatically modify state values based on the selected difficulty. See below:

public enum Difficulty
{
    EASY(0, 0.5f),
    MEDIUM(1, 1.0f),
    HARD(2, 2.0f);

    /**
     * Value for this difficulty
     */
    public final int Value;

    /**
     * Multiplier for difficulty
     */
    public final float DifficultyMultiplier;

    private Difficulty(int value, float multiplier)
    {
        Value = value;
        DifficultyMultiplier = multiplier;
    }
}

So now we’ve added the multiplier to the difficulty, we could use it like so:

enemy.speed = baseSpeed * difficulty.DifficultyMultiplier;
player.speed = baseSpeed / difficulty.DifficultyMultiplier;

This has the added advantage that you can manipulate the global difficulty in a single central place.

Posted by Dan in Guides, Java, 7 comments

Network Game Synchronisation

This is going to be a slightly more ‘abstract’ post compared to what I normally do, but I think it’ll be useful for anyone making multi-player games. The biggest problem with multi-player games is network latency & bandwidth. This is something you just have to design for with your game mechanics, for example many MMOs have ‘cast times’ for most actions to cover the latency between the various clients and the server.

In this post I’m going to show clock synchronisation, a kind of synchronisation where you can ensure your various clients are all sharing the same timestamp as the host, give or take a few ms. For my game, having the same clock on all clients means I can time actions to occur simultaneously across all users. The code below is Java for Android, but it can be ported across to other platforms easily enough.

First you need to request the host’s current timestamp:

_timeRequest = System.currentTimeMillis();
_networkDroid.sendMessage(address, GameMessage.REQUEST_TIME);

_timeRequest in this case is a long field, while _networkDroid is my networking layer. Next when you get a response, you need to get the offset between the host’s timestamp and the client’s:

long currentTime = System.currentTimeMillis();
long travelTime = (currentTime - _timeRequest) / 2;

_timeDifference = (int)(currentTime - (remoteTimestamp + travelTime));
_timeRequest = 0;

In this code we first get the client’s current time, we get this as early as possible to minimise the error margin. Next we work out how long it took the packet to arrive from the host – we do this by dividing the total transit time by 2 (the first half was sending the request). Next we work out the difference between the hosts timestamp (with transit time taken into account) and the client’s timestamp.

Finally to get the synchronised timestamp is simple:

return System.currentTimeMillis() - _timeDifference;

And there you have it, synchronised clocks!

Posted by Dan in Game, Guides, Programming, 0 comments

WP7Contrib Transitions Part 3 – LongListSelector

Make sure to read parts 1 and 2 first!

By now you’re probably loving the transitions on offer from WP7Contrib, but have found a slight problem in that the Turnstile Feather animation doesn’t work with the LongListSelector as provided by the WP7 Silverlight Toolkit. Fear not! For the opensource nature of WP7Contrib means we can extend the transitions functionality to support the LongListSelector as well as the standard ListBox. It should be noted that these changes aren’t perfect, and are largely a hack to add the functionality in as short a timespan as possible. You can download the demo app here to see the changes in action.

Let’s Have At It

First you need to download the WP7Contrib sourcecode, the code in this example is associated with revision 66430. You can try applying the changes to the latest revision, however note that things have most definitely moved on since 66430.

Open up the solution you’ve downloaded, then expand the ‘WP7Contrib.View.Transitions’ project. Expand ‘Animation’ and open up ‘TurnstileFeatherAnimator.cs’ and add the following properties to the class:

/// <summary>
/// Is BackwardIn or BackwardOut
/// </summary>
protected bool IsBackward { get; set; }

/// <summary>
/// Run the completion action first rather than on completion
/// </summary>
protected bool RunCompletionAnimationFirst { get; set; }

private Action _completionAnimationAction;
private Action _actualBeginAction;
private Action _completionAction;

Change the datatype of the ‘ListBox’ property to ‘Control’, this is so we can use either a ListBox or a LongListSelector without modifying client code.

The IsBackward property tells us if this is a Backward animation, this is required to fix some bugs in the way the LongListSelector handles itself when the page is restored when the user navigates backward.

The RunCompletionAnimationFirst property tells the animator to run the completion animation first or not. This is necessary because I perform a Turnstile animation on the RootElement to complete the feather effect. This turnstile animation needs to run first if the elements are animating in, and last if the elements are animating out.

The three Action properties are necessary to order animations in the correct order, and then perform the actual completion action. These properties will make more sense when you see the implementation details.

Now replace all of the methods in the ‘Public Methods’ region with the following:

/// <summary>
/// The begin.
/// </summary>
/// <param name="completionAction">
/// The completion action.
/// </param>
public override void Begin(Action completionAction)
{
    _completionAction = completionAction;
    completionAction = new Action(AnimationsCompleted);

    if (RunCompletionAnimationFirst)
    {
        _completionAnimationAction = ActualBegin;
        _actualBeginAction = completionAction;

        HideListItems();
        BeginCompletionAnimation();
    }
    else
    {
        _completionAnimationAction = completionAction;
        _actualBeginAction = BeginCompletionAnimation;

        ActualBegin();
    }
}

private void BeginCompletionAnimation()
{
    CompletionAnimation.RootElement = this.RootElement;
    CompletionAnimation.Begin(_completionAnimationAction);
}

private void HideListItems()
{
    if (ListBox is LongListSelector)
    {
        foreach (ContentPresenter li in ((LongListSelector)ListBox).GetItemsWithContainers(false, true).OfType<ContentPresenter>())
            li.Opacity = 0;
    }
    else if (ListBox is ListBox)
    {
        foreach (ContentControl li in ((ListBox)ListBox).GetVisualDescendants().OfType<ListBoxItem>().Where(lbi => IsOnCurrentPage(lbi) && lbi.IsEnabled))
            li.Opacity = 0;
    }
}

private void AnimationsCompleted()
{
    if (!this.IsBackward && ListBox is LongListSelector)
    {
        LongListSelector listBox = (LongListSelector)ListBox;

        listBox.UpdateLayout();
        listBox.SelectedItem = null;
    }

    _completionAction();

    _completionAnimationAction = null;
    _actualBeginAction = null;
    _completionAction = null;
}

private void ActualBegin()
{
    if (ListBox is ListBox)
        ActualBeginListBox();
    else if (ListBox is LongListSelector)
        ActualBeginLongListSelector();
    else
        throw new InvalidOperationException("ListBox must be of type System.Windows.Controls.ListBox or Microsoft.Phone.Controls.LongListSelector");

    base.Begin(_actualBeginAction);
}

private void ActualBeginListBox()
{
    Storyboard = new Storyboard();
    ListBox listBox = (ListBox)ListBox;

    double liCounter = 0;
    var listBoxItems = listBox.GetVisualDescendants().OfType<ListBoxItem>().Where(lbi => IsOnCurrentPage(lbi) && lbi.IsEnabled).ToList();

    if (HoldSelectedItem && Direction == Directions.Out && listBox.SelectedItem != null)
    {
        //move selected container to end
        var selectedContainer = listBox.ItemContainerGenerator.ContainerFromItem(listBox.SelectedItem);
        listBoxItems.Remove(selectedContainer as ListBoxItem);
        listBoxItems.Add(selectedContainer as ListBoxItem);
    }

    foreach (ContentControl li in listBoxItems)
    {
        GeneralTransform gt = li.TransformToVisual(RootElement);
        Point globalCoords = gt.Transform(new Point(0, 0));
        double heightAdjustment = li.Content is FrameworkElement ? ((li.Content as FrameworkElement).ActualHeight / 2) : (li.ActualHeight / 2);
        //double yCoord = globalCoords.Y + ((((System.Windows.FrameworkElement)(((System.Windows.Controls.ContentControl)(li)).Content)).ActualHeight) / 2);
        double yCoord = globalCoords.Y + heightAdjustment;

        double offsetAmount = (RootElement.ActualHeight / 2) - yCoord;

        PlaneProjection pp = new PlaneProjection();
        pp.GlobalOffsetY = offsetAmount * -1;
        pp.CenterOfRotationX = 0;
        li.Projection = pp;

        CompositeTransform ct = new CompositeTransform();
        ct.TranslateY = offsetAmount;
        li.RenderTransform = ct;

        var beginTime = TimeSpan.FromMilliseconds((FeatherDelay * liCounter) + InitialDelay);

        if (Direction == Directions.In)
        {
            li.Opacity = 0;

            DoubleAnimationUsingKeyFrames daukf = new DoubleAnimationUsingKeyFrames();

            EasingDoubleKeyFrame edkf1 = new EasingDoubleKeyFrame();
            edkf1.KeyTime = beginTime;
            edkf1.Value = Angle;
            daukf.KeyFrames.Add(edkf1);

            EasingDoubleKeyFrame edkf2 = new EasingDoubleKeyFrame();
            edkf2.KeyTime = TimeSpan.FromMilliseconds(Duration).Add(beginTime);
            edkf2.Value = 0;

            ExponentialEase ee = new ExponentialEase();
            ee.EasingMode = EasingMode.EaseOut;
            ee.Exponent = 6;

            edkf2.EasingFunction = ee;
            daukf.KeyFrames.Add(edkf2);

            Storyboard.SetTarget(daukf, li);
            Storyboard.SetTargetProperty(daukf, new PropertyPath("(UIElement.Projection).(PlaneProjection.RotationY)"));
            Storyboard.Children.Add(daukf);

            DoubleAnimation da = new DoubleAnimation();
            da.Duration = TimeSpan.FromMilliseconds(0);
            da.BeginTime = beginTime;
            da.To = 1;

            Storyboard.SetTarget(da, li);
            Storyboard.SetTargetProperty(da, new PropertyPath("(UIElement.Opacity)"));
            Storyboard.Children.Add(da);
        }
        else
        {
            li.Opacity = 1;

            DoubleAnimation da = new DoubleAnimation();
            da.BeginTime = beginTime;
            da.Duration = TimeSpan.FromMilliseconds(Duration);
            da.To = Angle;

            ExponentialEase ee = new ExponentialEase();
            ee.EasingMode = EasingMode.EaseIn;
            ee.Exponent = 6;

            da.EasingFunction = ee;

            Storyboard.SetTarget(da, li);
            Storyboard.SetTargetProperty(da, new PropertyPath("(UIElement.Projection).(PlaneProjection.RotationY)"));
            Storyboard.Children.Add(da);

            da = new DoubleAnimation();
            da.Duration = TimeSpan.FromMilliseconds(10);
            da.To = 0;
            da.BeginTime = TimeSpan.FromMilliseconds(Duration).Add(beginTime);

            Storyboard.SetTarget(da, li);
            Storyboard.SetTargetProperty(da, new PropertyPath("(UIElement.Opacity)"));
            Storyboard.Children.Add(da);
        }

        liCounter++;
    }
}

private void ActualBeginLongListSelector()
{
    Storyboard = new Storyboard();
    LongListSelector listBox = (LongListSelector)ListBox;

    double liCounter = 0;
    var listBoxItems = listBox.GetItemsWithContainers(false, true).OfType<ContentPresenter>().ToList();

    if (HoldSelectedItem && Direction == Directions.Out && listBox.SelectedItem != null)
    {
        //move selected container to end
        var listBoxItemsInView = listBox.GetItemsWithContainers(true, true).OfType<ContentPresenter>();
        var selectedContainer = listBoxItemsInView.Where(i => i.Content == listBox.SelectedItem).FirstOrDefault();

        if (selectedContainer != null)
        {
            listBoxItems.Remove(selectedContainer);
            listBoxItems.Add(selectedContainer);
        }
    }

    foreach (ContentPresenter li in listBoxItems)
    {
        GeneralTransform gt = li.TransformToVisual(RootElement);
        Point globalCoords = gt.Transform(new Point(0, 0));
        //double heightAdjustment = li.Content is FrameworkElement ? ((li.Content as FrameworkElement).ActualHeight / 2) : (li.ActualHeight / 2);
        double heightAdjustment = li.ActualHeight / 2;
        //double yCoord = globalCoords.Y + ((((System.Windows.FrameworkElement)(((System.Windows.Controls.ContentControl)(li)).Content)).ActualHeight) / 2);
        double yCoord = globalCoords.Y + heightAdjustment;

        double offsetAmount = (RootElement.ActualHeight / 2) - yCoord;

        PlaneProjection pp = new PlaneProjection();
        pp.GlobalOffsetY = offsetAmount * -1;
        pp.CenterOfRotationX = 0;
        li.Projection = pp;

        CompositeTransform ct = new CompositeTransform();
        ct.TranslateY = offsetAmount;
        li.RenderTransform = ct;

        var beginTime = TimeSpan.FromMilliseconds((FeatherDelay * liCounter) + InitialDelay);

        if (Direction == Directions.In)
        {
            li.Opacity = 0;

            DoubleAnimationUsingKeyFrames daukf = new DoubleAnimationUsingKeyFrames();

            EasingDoubleKeyFrame edkf1 = new EasingDoubleKeyFrame();
            edkf1.KeyTime = beginTime;
            edkf1.Value = Angle;
            daukf.KeyFrames.Add(edkf1);

            EasingDoubleKeyFrame edkf2 = new EasingDoubleKeyFrame();
            edkf2.KeyTime = TimeSpan.FromMilliseconds(Duration).Add(beginTime);
            edkf2.Value = 0;

            ExponentialEase ee = new ExponentialEase();
            ee.EasingMode = EasingMode.EaseOut;
            ee.Exponent = 6;

            edkf2.EasingFunction = ee;
            daukf.KeyFrames.Add(edkf2);

            Storyboard.SetTarget(daukf, li);
            Storyboard.SetTargetProperty(daukf, new PropertyPath("(UIElement.Projection).(PlaneProjection.RotationY)"));
            Storyboard.Children.Add(daukf);

            DoubleAnimation da = new DoubleAnimation();
            da.Duration = TimeSpan.FromMilliseconds(0);
            da.BeginTime = beginTime;
            da.To = 1;

            Storyboard.SetTarget(da, li);
            Storyboard.SetTargetProperty(da, new PropertyPath("(UIElement.Opacity)"));
            Storyboard.Children.Add(da);
        }
        else
        {
            li.Opacity = 1;

            DoubleAnimation da = new DoubleAnimation();
            da.BeginTime = beginTime;
            da.Duration = TimeSpan.FromMilliseconds(Duration);
            da.To = Angle;

            ExponentialEase ee = new ExponentialEase();
            ee.EasingMode = EasingMode.EaseIn;
            ee.Exponent = 6;

            da.EasingFunction = ee;

            Storyboard.SetTarget(da, li);
            Storyboard.SetTargetProperty(da, new PropertyPath("(UIElement.Projection).(PlaneProjection.RotationY)"));
            Storyboard.Children.Add(da);

            da = new DoubleAnimation();
            da.Duration = TimeSpan.FromMilliseconds(10);
            da.To = 0;
            da.BeginTime = TimeSpan.FromMilliseconds(Duration).Add(beginTime);

            Storyboard.SetTarget(da, li);
            Storyboard.SetTargetProperty(da, new PropertyPath("(UIElement.Opacity)"));
            Storyboard.Children.Add(da);
        }

        liCounter++;
    }
}

This is a lot of code! Fortunately this is the only major change to add the functionality we need. In the Begin method we set up our actions mentioned in the properties earlier. The completionAction is the action performed when all animations are completed, just like the original implementation. _actualBeginAction is the action the ActualBegin() method will execute upon completion. This will either be the completionAction, or an action to trigger the completion animation.

The completion animation is badly named, since it can run either at the start or the end of the feather animation.

After the actions are set up, we call the first animation. The first animation will then call the second animation, which will call the completionAction. So as an overview the method calls will be:

Completion animation first: Begin() > BeginCompletionAnimation() > HideListItems() > ActualBegin() > AnimationsCompleted() > CompletionAction()
Completion animation last: Begin() > ActualBegin() > BeginCompletionAnimation() > AnimationsCompleted() > CompletionAction()

We have an additional call to HideListItems() if the completion animation is run first. This is because the screen pivots in and then animates the list. The problem is if the list is visible from the outset you would see the list turnstile-in, then suddenly disappear and animate.

ActualBegin() is where we perform the actual Feather animation. We check the type of control passed in, and trigger the correct animation code. The code is largely the same between the two except for a little setup where we use the methods provided by the LongListSelector to get the containers for the visible elements. This means implementation on the surface is actually easier than with the ListBox where we have to work out which elements are visible.

AnimationsCompleted()

So why do we have an additional method that we run at the end of the animation? This is neccesary to fix a bug in the LongListSelector where the control won’t respond to input from the user after the animation is completed. We call UpdateLayout() to trigger the LongListSelector to sort itself out. Finally we set the SelectedItem to null. This is an implementation detail I’ve found useful for myself – however, you may well want to remove this line. In essence by leaving the item selected, it is the last item to animate off of the list. However, I never want the item to remain selected, so I clear the selection automatically. This isn’t ideal behaviour for a professional control, so don’t go duplicating this kind of hideous hack in your own controls!

Finishing Up

Now we need to tweak the animators themselves to support the new functionality. Update the animators as follows:

public TurnstileFeatherBackwardInAnimator()
{
    this.IsBackward = true;
    this.Duration = 350;
    this.Angle = 50;
    this.FeatherDelay = 50;
    this.Direction = Directions.In;
    this.CompletionAnimation = new TurnstileBackwardInAnimator();
    this.RunCompletionAnimationFirst = true;
}
public TurnstileFeatherBackwardOutAnimator()
{
    this.IsBackward = true;
    this.Duration = 250;
    this.Angle = -80;
    this.FeatherDelay = 50;
    this.Direction = Directions.Out;
    this.CompletionAnimation = new TurnstileBackwardOutAnimator();
}
public TurnstileFeatherForwardInAnimator()
{
    this.Duration = 350;
    this.Angle = -80;
    this.FeatherDelay = 50;
    this.Direction = Directions.In;
    this.CompletionAnimation = new TurnstileForwardInAnimator();
    this.RunCompletionAnimationFirst = true;
}
public TurnstileFeatherForwardOutAnimator()
{
    this.Duration = 250;
    this.Angle = 50;
    this.FeatherDelay = 50;
    this.Direction = Directions.Out;
    this.HoldSelectedItem = true;
    this.CompletionAnimation = new TurnstileForwardOutAnimator();
}

And you’re done!

LongListSelector Scrolling

OK, I may have lied a little about you being done. The LongListSelector has one final issue when we animate, it doesn’t retain its scroll position. The easiest way to solve this is to sub-class AnimatedBasePage and perform the necessary ‘tweaks’ to the selector in the AnimationsComplete() method. But before I show you the code, you’ll need ‘Linq to Visual Tree’ by Colin Eberhardt. The code file is already included in the demo app. Now you’ve got the necessary code, you can add the AnimationsComplete() method to your newly created page class:

public class TransitionPage : AnimatedBasePage
{
    protected override void AnimationsComplete(AnimationType animationType)
    {
        if (animationType == AnimationType.NavigateBackwardIn || animationType == AnimationType.NavigateBackwardOut)
        {
            foreach (LongListSelector listBox in this.Descendants<LongListSelector>())
            {
                listBox.UpdateLayout();

                if (listBox.SelectedItem != null)
                    listBox.ScrollTo(listBox.SelectedItem);
                else
                {
                    object firstObj = listBox.GetItemsInView().Where(i => i != null).FirstOrDefault();

                    if (firstObj != null)
                        listBox.ScrollTo(firstObj);
                }
            }
        }

        base.AnimationsComplete(animationType);
    }
}

This code picks up if the animation is a backward one, and will automatically loop through all of the LongListSelectors (if you have multiple selectors across PivotItems or PanoramaItems they’ll all lose their position) and corrects their position.

Am I actually done now?

Yes, yes you are! It’s been a long road just to add a Feather Turnstile animation to a LongListSelector, but I believe it’s well worth it. The effect looks great and adds a great deal of professionalism to your app.

This concludes the ‘Transitions’ series of blog posts. As always, you can download the sample app here.

Issues

As with all things, there are a few gotchas. The first is the dreaded ‘AG_E_PARSER_BAD_TYPE’ error. This error can occur when you subclass AnimatedBasePage. To this date I still haven’t resolved the issue – it’s very inconsistent and affects some projects but not others. The easiest workaround is to use extension methods and call those from each individual page. It’s far from ideal and a simply hideous hack – but it does work.

The other issue you may get is a page simply refusing to navigate to another. Chances are you’re requesting a navigation too quickly – the page hasn’t finished initialising. The easiest solution in this case is to use the ‘OneShotDispatcherTimer’ from the Kawagoe Toolkit. You can use the timer like so:

OneShotDispatcherTimer timer = new OneShotDispatcherTimer()
{
    Duration = new TimeSpan(0, 0, 1)
};

timer.Fired += (object sender, EventArgs e) => NavigationService.Navigate(new Uri("/NextPage.xaml", UriKind.Relative));
timer.Start();
Posted by Dan in C#, Tutorials, Windows Phone, 0 comments

WP7Contrib Transitions Part 2 – More Advanced Transitions

Make sure to read part 1 first!

WP7Contrib offers numerous transitions, these include:

Continuum
The selected item in a list will animate out, and the next page will have the heading animate in. The reverse happens on returning to the original page. This is a great effect if the user is selecting a specific item to view more detail.

Rotate
The page rotates in/out. A bit ostentatious for my tastes.

Slide
There are various slide animations offered, these mimic the kinds of transitions you get with iOS. SlideUp and SlideDown are ideal for popups.

Turnstile
The default transition we all know and love

Turnstile Feather
My personal favourite, and one we’ll see a lot more of in Part 3. This is the same as Turnstile, except it will animate out each element in a list from top to bottom. This is the same effect you see on the phone home screen when you select an app to launch.

If you want to see all of the transitions on offer, download the WP7Contrib source code and open the ‘PageTransitions’ solution within the ‘Spikes’ folder. This provides a demo of all of the transitions on offer within WP7Contrib.

Let’s Play

Let’s try the Turnstile Feather and Continuum transitions out. You’ll need a project with a screen that’s a ListBox, if you don’t have one, download the demo app from the first part of this series. If you want to see the demo right now, click here to download the demo app for part 2.

Go into the code-behind for the page with the ListBox and add the following override:

protected override AnimatorHelperBase GetAnimation(AnimationType animationType, Uri toOrFrom)
{
    return base.GetAnimation(animationType, toOrFrom);
}

This is an extremely powerful override that allows you to fully customise the kind of animation used when the page is navigated to or from. The first parameter is the type of animation you need to return. The second parameter is the uri for the page that the user is either navigating to, or navigating from. If ever you’re not sure, use the base implementation which will almost always provide a Turnstile animation. The Turnstile animation is a good fall-back animation, so it’s often wise to handle specific cases yourself, and let the base implementation handle the rest.

Now you could run the app right now and it’ll work, but we want to trigger a Continuum transition on the way out, and a Turnstile Feather animation on the way back in. To do this, we need to tell which animations we want WP7Contrib to use:

protected override AnimatorHelperBase GetAnimation(AnimationType animationType, Uri toOrFrom)
{
    switch (animationType)
    {
        case AnimationType.NavigateForwardOut:
        case AnimationType.NavigateBackwardOut:
            return this.GetContinuumAnimation(TheListBox, animationType);

        case AnimationType.NavigateBackwardIn:
            return new TurnstileFeatherBackwardInAnimator()
            {
                ListBox = TheListBox,
                RootElement = LayoutRoot
            };

        case AnimationType.NavigateForwardIn:
            return new TurnstileFeatherForwardInAnimator()
            {
                ListBox = TheListBox,
                RootElement = LayoutRoot
            };
    }

    return base.GetAnimation(animationType, toOrFrom);
}

Notice we let WP7Contrib handle any animations we don’t explicitly handle ourselves. This ensures if the app is extended in the future the user experience isn’t unduly affected.

The Continuum animation has three properties, a StoryBoard, RootElement and LayoutRoot. This allows you to customise the animation applied to the selected element, however most of the time the default animation is the correct one. For this reason we get WP7Contrib to create the animation for us by calling GetContinuumAnimation.

The Turnstile Feather animation requires the ListBox you wish to animate and the RootElement. The RootElement in this case is the same element you set as the AnimationContext. You could set a different RootElement if required, but it’s unlikely you’ll ever need to do this.

Now run your app and admire your handy work! You can download a fully functional demo project here.

Want yet more? Click here for part 3.

Posted by Dan in C#, Tutorials, Windows Phone, 6 comments

WP7Contrib Transitions – Easy Page Transitions for Windows Phone 7, Part 1

WP7Contrib offers an alternative to the WP7 Silverlight Toolkit transitions, and in my humble opinion, the alternative is significantly better in this case. The Silverlight toolkit offers easy integration of transitions via a little XAML markup and a minor change to the root frame. The biggest problem with the toolkit transitions are that they’re slow and exceedingly memory intensive with complex layouts consuming copious amounts of memory. In my latest app the transitions alone could use up to 40MB. Don’t forget, there is a 90MB limit for all apps when operating on devices with 256MB RAM.

WP7Contrib offers an alternative that’s code-based rather than markup-based. This may be preferable, or it may not depending on your internal setup. Personally for something like transitions I prefer code-based so transitions are the ‘default’ rather than the exception.

The greatest thing about WP7Contrib Transitions, is that they’re a doddle to implement if you just want to have transitions between pages. In WP7 the ‘standard’ transition is the turnstile transition – this is where each screen appears and disappears as if they’re pages in a book. Here’s how to get this transition into your app:

Simple Transitions

If you want to see the transitions for yourself, click here to download the demo app. Otherwise , download WP7Contrib and compile it. Once you’ve done this, add the WP7Contrib.View.Controls and WP7Contrib.View.Transitions assemblies to your project References. These are the only two assemblies required to get transitions working, and I prefer to include as few assemblies as possible to keep load times fast.

Next you need to make some minor tweaks to every page you want to animate. Add the following namespace to the XAML file:

xmlns:animation="clr-namespace:WP7Contrib.View.Transitions.Animation;assembly=WP7Contrib.View.Transitions"

Next change the page type to ‘animation:AnimatedBasePage’. To do this the first line of your XAML file should be:

<animation:AnimatedBasePage

And the last line should be:

</animation:AnimatedBasePage>

Now go into the code-behind and change the base type of your page to ‘AnimatedBasePage’. The final change is to add the following line into the constructor:

AnimationContext = LayoutRoot;

This tells WP7Contrib that your ‘root element’ is ‘LayoutRoot’. You can set any element to be the AnimationContext, this is useful if you want to only animate a sub-area of the page between pages. Generally speaking you’ll want to target LayoutRoot, or whichever element you’ve got containing all of your UI. This is the big difference between WP7Contrib and the WP7 Toolkit which targets the page frame itself.

Compile and run your app – you should find your pages automatically use the turnstile transition. Don’t forget you can download the demo app here.

Personally, I can’t recommend WP7Contrib transitions enough. They have a few caveats, but the performance improvements and memory savings are substantial. I hope that this article has given you a taster of the transitions and how easy they are to implement.

Hungry for more? Click here to view part 2 where we cover additional transitions.

Posted by Dan in C#, Tutorials, Windows Phone, 6 comments

Global ProgressBar in WP7

I quite like to have a global Performance Progress Bar in my Windows Phone 7 apps so the user has a consistent frame of reference when I’m interacting with web services. The requirements are simple, a progress bar that appears on all pages without any special requirements (ie. no custom controls, special code snippets, etc.). It should be managed in one place, and be easy to extend. Fortunately the extreme flexibility Silverlight offers makes this a doddle:

First add the following style to your App.xaml file:

<Style x:Key="mainFrameStyle" TargetType="phone:PhoneApplicationFrame">
    <Setter Property="Template">
        <Setter.Value>
            <ControlTemplate TargetType="phone:PhoneApplicationFrame">
                <Border x:Name="ClientArea"
                        BorderBrush="{TemplateBinding BorderBrush}"
                        BorderThickness="{TemplateBinding BorderThickness}"
                        Background="{TemplateBinding Background}"
                        HorizontalAlignment="{TemplateBinding HorizontalAlignment}"
                        VerticalAlignment="{TemplateBinding VerticalAlignment}">
                    <Grid>
                        <toolkit:PerformanceProgressBar
                            IsIndeterminate="True"
                            VerticalAlignment="Top"
                            Canvas.ZIndex="999"
                            Foreground="{StaticResource PhoneAccentBrush}"
                            Visibility="Collapsed"
                            Loaded="globalProgressBar_Loaded"
                            />
                        <layout:ContentControl
                                ContentTemplate="{TemplateBinding ContentTemplate}"
                                Content="{TemplateBinding Content}"
                                HorizontalAlignment="{TemplateBinding HorizontalAlignment}"
                                HorizontalContentAlignment="{TemplateBinding HorizontalContentAlignment}"
                                VerticalAlignment="{TemplateBinding VerticalAlignment}"
                                VerticalContentAlignment="{TemplateBinding VerticalContentAlignment}"
                                Margin="{TemplateBinding Padding}">
                        </layout:ContentControl>
                    </Grid>
                </Border>
            </ControlTemplate>
        </Setter.Value>
    </Setter>
</Style>

Next go into the code behind, and add the following variable to the top of the class:

private PerformanceProgressBar _globalProgressBar = null;

Next add the following methods to the bottom the App class:

private void globalProgressBar_Loaded(object sender, RoutedEventArgs e)
{
    _globalProgressBar = sender as PerformanceProgressBar;
}

public void ShowProgressBar()
{
    if (_globalProgressBar != null)
        _globalProgressBar.Visibility = Visibility.Visible;
}

public void HideProgressBar()
{
    if (_globalProgressBar != null)
        _globalProgressBar.Visibility = Visibility.Collapsed;
}

Now find the InitializePhoneApplication() method, and amend the RootFrame instantiation code to the following:

RootFrame = new PhoneApplicationFrame()
{
    Style = (Style)Resources["mainFrameStyle"]
};

And you’re done! You can call the progress bar like so:

((App)App.Current).ShowProgressBar();
((App)App.Current).HideProgressBar();

You can download the sample project here for your reference.

Update: This method for displaying a global ProgressBar doesn’t always play well with the WP7 Toolkit Transitions. However, I would highly recommend using the WP7Contrib Transitions anyway (they work well with the global ProgressBar too). I’ve created a 3-part guide on the transitions here.

Posted by Dan in C#, Guides, Windows Phone, 3 comments

LongListSelector ListFooterTemplate {Binding} Resolves to NULL

It’s quite common to have a ‘More’ button at the end of long lists within a LongListSelector. The problem is the template inexplicably doesn’t cascade the DataContext, so you have no access to the collection to trigger a more command. Fortunately the workaround is simple, albeit you can’t use pre-defined DataTemplates.

<toolkit:LongListSelector x:Name="SimilarList" ItemTemplate="{StaticResource GeneralCatalogListItemTemplate}" SelectionChanged="SimilarList_SelectionChanged" DataContext="{StaticResource dummyCatalogTitlesList}" ItemsSource="{Binding}" IsFlatList="True">
    <toolkit:LongListSelector.ListFooterTemplate>
        <DataTemplate>
            <bindings:CommandButton Content="More..." Command="{StaticResource moreCommand}" DataContext="{Binding ElementName=SimilarList, Path=DataContext}" CommandParameter="{Binding}" />
        </DataTemplate>
    </toolkit:LongListSelector.ListFooterTemplate>
</toolkit:LongListSelector>

You need to give your list a name, then when setting the DataContext for your controls make sure to provide the ElementName as seen above.

I’m not sure why the other templates cascade correctly and this one doesn’t, but I’m hopeful it’ll be fixed in a future release of the toolkit. As an aside there is a fairly clean workaround if/when MS add the Freezable class to WP7.

Posted by Dan in C#, Windows Phone, 2 comments