Tutorials

Tutorials on how to do things

Implementing IParcelable in Mono for Android

If you want to pass values between activities in Android, you’ll probably want to implement Parcelable sooner or later. This isn’t particularly slick even when writing natively, but add Mono in and it becomes even murkier. Fortunately .NET’s Generics support helps us out a little. The reason for the rather heavy implementation is intents can cross process boundaries, meaning you can’t just provide a memory address. This gives you the ability to call apps / resources you haven’t programmed yourself, but unfortunately it means inter-activity communication is ‘heavy’ for want of a better term. If you’re thinking of using IParcelable in a brand new app that isn’t going to be receiving 3rd party parcels, consider the ‘alternatives’ at the end of this guide first. IParcelable is somewhat of a convenience API for serialising objects to binary and then de-serialising. You might be better off doing this yourself rather than using the ‘Android’ method.

Our Class

For this demo I want to pass an array of a really simple class:

public sealed class SelectListItem
{
	// Convenience constructors
	public SelectListItem() {}
	public SelectListItem(int id, string name)
	{
		Id = id;
		Name = name;
	}

	// The actual properties for this class
	public int Id { get; set; }
	public string Name { get; set; }
}

Reference ‘Mono.Android.Export’

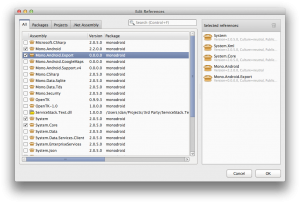
Before we start, make sure to reference the ‘Mono.Android.Export’ assembly:

Mono.Android.Export Assembly Reference

Implementing IParcelable

This class will be used to populate a ListActivity with a series of items that can be selected. First we need to inherit from Java.Lang.Object, and implement the IParcelable interface:

public sealed class SelectListItem : Java.Lang.Object, IParcelable

So why do we have to inherit from Java.Lang.Object? The Android runtime needs to be able to call the methods that we define as part of IParcelable, to do this our class must have a dual-personality. One half of the class is .NET, the other half is Java, it is this Java side that Android can see. When a method is called on the Java side, it will execute the .NET code. Clever huh? Unfortunately this means we now have two objects instead of one in memory, it also means that Mono must keep track of both objects. To do this it uses a global ID or reference, this reference links the two instances together. Unfortunately GREFs, are a very, very limited resource. The emulator only supports ~2,000 and devices usually only support ~50,000 GREFs. For more information on GREFs, check the Architecture and Garbage Collection documents over at Xamarin.

Before we implement the interface, we need to add an additional constructor that can accept a Parcel type. This constructor will populate the instance with the values from the parcel – the parcel being the ‘wrapped’ data of an instance of the same type:

// Create a new SelectListItem populated with the values in parcel
private SelectListItem(Parcel parcel)
{
	Id = parcel.ReadInt();
	Name = parcel.ReadString();
}

Note the order we read in the values, this is very important and must mirror the order in WriteToParcel below.

Next we need to implement the interface:

public int DescribeContents()
{
	return 0;
}

// Save this instance's values to the parcel
public void WriteToParcel(Parcel dest, ParcelableWriteFlags flags)
{
	dest.WriteInt(Id);
	dest.WriteString(Name);
}

DescribeContents is used for flagging ‘special objects’ within the parcel. I’ve never had cause to use this field, and 0 means ‘no special objects’.

WriteToParcel is where we write the instance data to the parcel, pay special attention to the order you write the values. This same order must be mirrored when reading in the parcel above. The flags attribute gives additional information on how the data should be written, it’s unlikely you’ll need to check these flags.

The CREATOR field

All Parcelable objects must have a public static field called CREATOR. The instance behind this field is responsible for creating instances of the object and populating them from the parcel. This can be done in two ways, an internal class that is implementation-specific, or a generic class that can be re-used repeatedly. The first method is the method commonly used in Java applications. However, with .NET we gain a much more robust Generics implementation so we’ll go down that route. However if you’re interested in the Java-favoured implementation it’s available in the sample project as a comment.

Without further ado, let’s look at how to declare our creator:

// The creator creates an instance of the specified object
private static readonly GenericParcelableCreator<SelectListItem> _creator
	= new GenericParcelableCreator<SelectListItem>((parcel) => new SelectListItem(parcel));

[ExportField("CREATOR")]
public static GenericParcelableCreator<SelectListItem> GetCreator()
{
	return _creator;
}

First we declare a private static instance, it’s required to be static by the Android API. Because this instance is static, it’s critical that your creator is thread safe otherwise bad things will happen. After the actual instance declaration we create a public static method, and decorate it with the ExportField attribute. Unfortunately this attribute can only be used on methods, so we can’t decorate our field directly. ExportField will ensure the Java version of our class gains a public static field named CREATOR.

A Generic ParcelableCreator Implementation

Earlier I mentioned that when developing with Java, each Parcelable requires a custom creator. Fortunately with .NET we gain a robust Generic implementation and we can use a generic creator that we can use again and again:

public sealed class GenericParcelableCreator<T> : Java.Lang.Object, IParcelableCreator
	where T : Java.Lang.Object, new()
{
	private readonly Func<Parcel, T> _createFunc;

	/// <summary>
	/// Initializes a new instance of the <see cref="ParcelableDemo.GenericParcelableCreator`1"/> class.
	/// </summary>
	/// <param name='createFromParcelFunc'>
	/// Func that creates an instance of T, populated with the values from the parcel parameter
	/// </param>
	public GenericParcelableCreator(Func<Parcel, T> createFromParcelFunc)
	{
		_createFunc = createFromParcelFunc;
	}

	#region IParcelableCreator Implementation

	public Java.Lang.Object CreateFromParcel(Parcel source)
	{
		return _createFunc(source);
	}

	public Java.Lang.Object[] NewArray(int size)
	{
		return new T[size];
	}

	#endregion
}

The creator must also be usable directly by Android, so again we have to inherit from Java.Lang.Object. We add two restrictions to the generic type parameter, first it must inherit from Java.Lang.Object (as all Parcelables must), and second it must have an empty constructor. This allows us to create an array of instances of the type, as required by IParcelableCreator.

Next in the constructor we require a delegate that can create and populate an instance of T. If you check back at our instantiation of the creator, we use a lambda expression that instantiates the instance using the private constructor we created that accepts a Parcel. Finally we implement the two methods required by IParcelableCreator, these simply create and populate the type, or create an array of the type.

Also remember that the creator must be thread-safe, if it isn’t bad things happen. To ensure thread safety we’ve made the state immutable, immutable types are by definition thread safe. If you need to create your own creator, be careful to follow thread safety guidelines. Microsoft have a good book on patterns and thread safety you can download for free.

Sample Code

You can download the sample project from GitHub here.

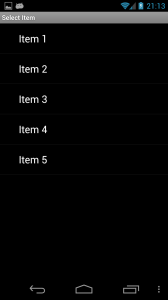
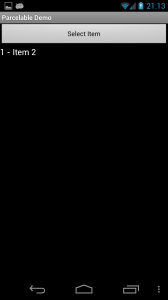
Select Item Item Selection Item Selected

Alternative to IParcelable

The problem with Parcelables is that you’re using up your very limited GREF resource. Additionally running two instances of an object across two garbage collectors isn’t the best use of memory or CPU resources. You’ll actually double up on instances as well, the instances that get packaged up in a parcel, and the instances that get extracted. The first set (senders) you can often clear from memory quickly, however the second set (received values) could be memory resident for quite some time as they’re used by the activity. The alternative is to either send just enough information for the activity to generate its own data, or you can send the data in an alternative format. You can send byte arrays, so you can use ISerializable and serialise your objects to binary. The other option is to use JSON (or other text-based format) and pass JSON strings between activities instead.

Unfortunately there is no ‘best’ solution, only the solution that meets your specific needs best.

Posted by Dan in C#, Mono for Android, Programming, Tutorials, 2 comments

Using the Keychain in MonoMac

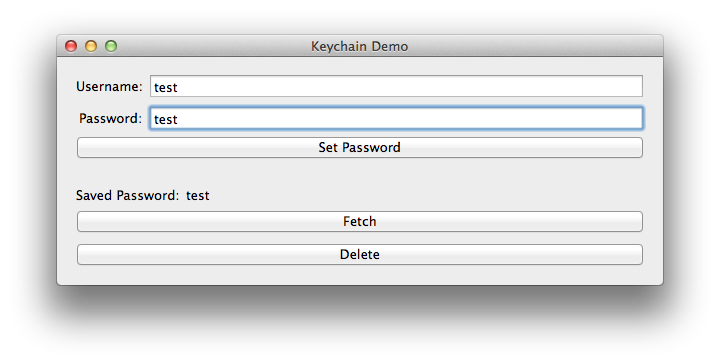
The keychain is a great feature in OS X, allowing you to store passwords securely. In this tutorial I’ll outline how to store passwords in the keychain so your apps don’t have to worry about securely storing the passwords themselves.

Before I start, you can skip straight to the code on github here.

A few pointers

The MonoMac binding of the OS X keychain is somewhat basic at this moment in time, however it should be enough for basic password storage. OS X supports multiple keychains, as well as multiple types of passwords. At the moment the MonoMac bindings limit you to the system (well, user’s login) keychain, and only the ‘Internet Password’ keychain type.

Additionally you’ll want to sign your app to ensure your passwords are uniquely identified, without signing I’ve noticed that other MonoMac apps authored by myself seem to conflict with each other.

Relevant Classes

We store keychain records in a class of SecRecord, while the SecKeyChain static class handles the interaction with the keychain itself. When searching for records, you’ll fill in a SecRecord with the fields you need to match, then get SecKeyChain to return a matching record. You need to be careful not to try and insert duplicate records, if you do it’ll be difficult to pull out the record you want – it’s undefined which one you’ll get. This can lead to odd bugs where one second you get the correct password, and the next you get the wrong one.

The password for Internet Passwords is stored in the ValueData property, this is of NSData type rather than the string you’re probably expecting.

Selecting

To fetch a record, you need to provide a record with the fields you want to filter by set. At a minimum you’ll want to specify the service and account (username):

var searchRecord = new SecRecord(SecKind.InternetPassword)
{
    Service = ServiceName,
    Account = username
};

SecStatusCode code;
var data = SecKeyChain.QueryAsRecord(searchRecord, out code);

if (code == SecStatusCode.Success)
    return data;
else
    return null;

This code will return a matching record, or NULL if none are found. If more than one record matches your search criteria, you’ll get a random record. For this reason make sure you never accidentally insert duplicate records, or you’ll get unpredictable behaviour in your app. Remember, the search record you specify will be used as the search criteria – the filled in fields will be used for the search.

To get the password from the record use the following code:

password = NSString.FromData(record.ValueData, NSStringEncoding.UTF8);

Remember, the ValueData property is NSData, not a string. If MonoMac allows you to use a record type of ‘Generic Password’, the password will be stored in the Generic property rather than ValueData. Generic is also an NSData type.

Inserting

Inserting a password involves filling out a SecRecord, and then calling Add() on SecKeyChain:

var record = new SecRecord(SecKind.InternetPassword)
{
    Service = ServiceName,
    Label = ServiceName,
    Account = username,
    ValueData = NSData.FromString(password)
};

SecKeyChain.Add(record);

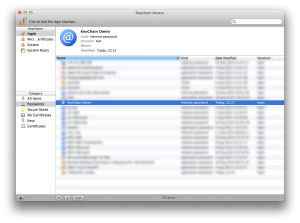
However, if you remember from earlier – you never want to insert a record without checking for an existing one because you’ll risk adding a duplicate record. Once inserted, you’ll see your password in the keychain utlity:

For code on how to perform a check and then update / insert as necessary, check the sample code.

Updating

Updating involves sending in the existing record (or at least one that’ll uniquely identify the record you’re after), and a new record to replace it:

record.ValueData = NSData.FromString(password);
SecKeyChain.Update(searchRecord, record);

The first parameter is handled in exactly the same was as when querying for an existing record, the second parameter is your newly updated record.

Deleting

Deleting is remarkably similar to updating, except you only send in your search record:

var searchRecord = new SecRecord(SecKind.InternetPassword)
{
    Service = ServiceName,
    Account = username
};

SecKeyChain.Remove(searchRecord);

Finishing Up

This guide has demonstrated how to interact with the OS X keychain using MonoMac. Make sure to check out the sample project for a simple utility class that wraps up all of the necessary functionality with a friendly interface.

Posted by Dan in C#, Mac, Tutorials, 2 comments

iPhone Glyphs from ‘Apple Symbols’ in Lion / Mountain Lion

The Apple Symbols font provides a lot of the symbols used in iOS, however since Lion it’s been harder to get at them. Here is how to use them if you’re on Lion or above:

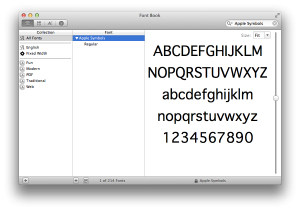
First open Font Book and open up the Apple Symbols font.

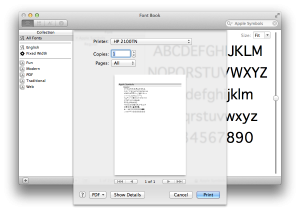
Next, bring up the print dialog (CMD + P).

Now click on ‘Show Details’

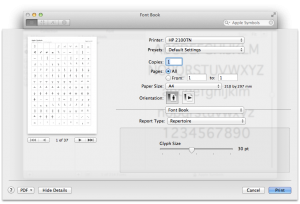
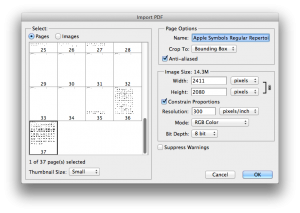
Change the Report Type to ‘Repetoire’. Next change the glyph size to something larger, I find 30pt about right most of the time.

Now click on the PDF button in the bottom left, and save the PDF somewhere.

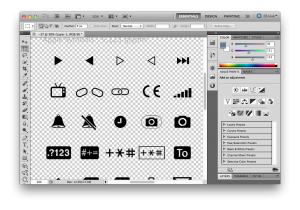
Next, start up Photoshop and drag the PDF into the stage.

You want the last couple of pages for the iOS glyphs. Make sure the resolution is high enough, I like to go for a dpi of 300. Click on OK and you should be presented with the glyphs nicely anti-aliased with a transparent background:

Glyps are ready to go!

Posted by Dan in Guides, iOS, Programming, Tutorials, 0 comments

Using UIGestureRecognizer in MonoTouch

Gesture Recognisers are a great feature added in iOS 3.2 (ages ago!), and using them in MonoTouch couldn’t be simpler. I’ll skip over a discussion on how they work, if you want more info on the recognisers themselves, be sure to check out the Apple documentation.

Selectors

UIGestureRecognizer instances use selectors to call back methods in your class. Selectors are supported in MonoTouch, you just need to do a little more work:

[Export("ViewTapSelector")]
protected void OnViewTapped(UIGestureRecognizer sender)
{
    MessageLabel.Text = "View Tapped";
}

Essentially you need to create a method, then mark it for export. This tells the MonoTouch compiler to make the method callable by ObjC code. Make sure the containing class is decorated with the Register attribute (ViewControllers are automatically registered).

First Recogniser

Setting up a UIGestureRecognizer is very easy:

var tapRecogniser = new UITapGestureRecognizer(this, new MonoTouch.ObjCRuntime.Selector("ViewTapSelector"));
View.AddGestureRecognizer(tapRecogniser);

This creates a new recogniser, with a callback and assigns it to the root view for the controller. You don’t need to worry about garbage collection since the view will retain the recogniser. You can access all of the recognisers for a view by using the GestureRecognizers property.

That’s it!

Surprisingly that’s all there is to it! You can download an example project here, or just view the code snippet below to flesh out the principles:

Sample Code

private void SetupGestureRecognisers()
{
    var tapRecogniser = new UITapGestureRecognizer(this, new MonoTouch.ObjCRuntime.Selector("ViewTapSelector"));
    View.AddGestureRecognizer(tapRecogniser);

    var doubleTapRecogniser = new UITapGestureRecognizer(this, new MonoTouch.ObjCRuntime.Selector("ViewDoubleTapSelector"));
    doubleTapRecogniser.NumberOfTapsRequired = 3;
    View.AddGestureRecognizer(doubleTapRecogniser);

    var longPressRecogniser = new UILongPressGestureRecognizer(this, new MonoTouch.ObjCRuntime.Selector("LongPressSelector"));
    View.AddGestureRecognizer(longPressRecogniser);

    var panRecogniser = new UIPanGestureRecognizer(this, new MonoTouch.ObjCRuntime.Selector("LabelPanSelector"));
    DragLabel.AddGestureRecognizer(panRecogniser);
}

[Export("ViewTapSelector")]
protected void OnViewTapped(UIGestureRecognizer sender)
{
    MessageLabel.Text = "View Tapped";
}

[Export("ViewDoubleTapSelector")]
protected void OnViewDoubleTapped(UIGestureRecognizer sender)
{
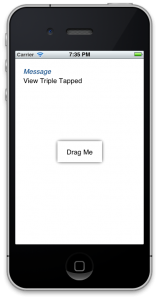
    MessageLabel.Text = "View Triple Tapped";
}

[Export("LongPressSelector")]
protected void OnLongPress(UIGestureRecognizer sender)
{
    MessageLabel.Text = "View Long Pressed";
}

[Export("LabelPanSelector")]
protected void OnLabelPan(UIGestureRecognizer sender)
{
    var panRecogniser = sender as UIPanGestureRecognizer;

    if (panRecogniser == null)
        return;

    switch (panRecogniser.State)
    {
        case UIGestureRecognizerState.Began:
            _originalPosition = DragLabel.Frame.Location;
            break;

        case UIGestureRecognizerState.Cancelled:
        case UIGestureRecognizerState.Failed:
            DragLabel.Frame = new RectangleF(_originalPosition, DragLabel.Frame.Size);
            break;

        case UIGestureRecognizerState.Changed:
            var movement = panRecogniser.TranslationInView(View);
            var newPosition = new PointF(movement.X + _originalPosition.X, movement.Y + _originalPosition.Y);
            DragLabel.Frame = new RectangleF(newPosition, DragLabel.Frame.Size);
            break;
    }
}
Posted by Dan in C#, iOS, MonoTouch, Tutorials, 4 comments

Cocos2D Sound in Android Tutorial

Update: This code is using an outdated version of the Cocos2D port. It’ll still work if you use the sample download linked at the end – but it’s using outdated API calls. Unfortunately I don’t have time to update the tutorial to the new release of Cocos2D. Sorry guys 🙁

Cocos2D for Android provides a very rudimentary sound system for playing background music, and simple sound effects. For the vast majority of games, this is plenty. However, if you have more advanced requirements you may need to look into either rolling out your own sound engine or sourcing something more complete elsewhere.

Overview

The Cocos2D ‘SoundEngine’ class provides all of the functionality you’ll need. It groups audio into two main groups: ‘Sound’ and ‘Effect’. Effects are the explosions, jump sounds, and other general effects you have within games. Sound is the background music and is the only audio type that can be paused and resumed. Sound effects should be kept under 5 seconds long, and ideally they should be under 3 seconds.

Android supports a wide range of different audio formats, you can view a complete list here. However, I’ve found that the SoundEngine doesn’t necessarily support all of these formats – so please do test your audio on a real device, preferably a few.

Let’s start coding!

Create a new Android project in your IDE of choice, IntelliJ Idea is my favourite, but Eclipse is very good also. You also need to download the latest source code for cocos2d-android-1, the downloadable jar doesn’t include the SoundEngine code. Include the source into your project – this also has the added advantage that you can poke around the code to see how everything works.

Also you need to add the two audio files in this zip, and put them in the ‘raw’ folder within the ‘resources’ folder. If you don’t have a raw folder, create it.

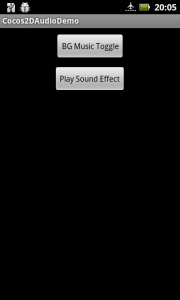
Before we get into any real coding, we’ll need to create a very rudimentary GUI to allow us to interact with the sound system. We’ll add two buttons to the main layout, one to play some background music and another to play a single sound effect:

<?xml version="1.0" encoding="utf-8"?>
<LinearLayout xmlns:android="http://schemas.android.com/apk/res/android"
    android:orientation="vertical"
    android:layout_width="fill_parent"
    android:layout_height="fill_parent"
    >
    <Button
        android:layout_height="wrap_content"
        android:layout_width="wrap_content"
        android:layout_gravity="center_horizontal"
        android:layout_marginTop="10dp"
        android:text="BG Music Toggle"
        android:onClick="bgMusicClicked" />

    <Button
        android:layout_height="wrap_content"
        android:layout_width="wrap_content"
        android:layout_gravity="center_horizontal"
        android:layout_marginTop="10dp"
        android:text="Play Sound Effect"
        android:onClick="sfxClicked" />
</LinearLayout>

Using SoundEngine

The SoundEngine offers functionality to pre-load audio, this is critical to ensure sound effects are played instantly. It also means we can use compressed audio formats such as mp3, without slowing down our game. Add the following field to the top of the main activity:

private Context _cocos2dContext;

Next add the following code to the onCreate() method:

_cocos2dContext = this;

// Preload background music
SoundEngine.sharedEngine().preloadSound(_cocos2dContext, R.raw.background_music_aac);

// Preload sound effect
SoundEngine.sharedEngine().preloadEffect(_cocos2dContext, R.raw.pew_pew_lei);

This code sets the context we’ll use for playing audio, and preloads the background audio, and the sound effect. We set the context to the current activity; this is because we’re not actually using Cocos2D in this demo. In your actual games you would use CCDirector.sharedDirector().getActivity() instead of this.
Now, create the event handlers for the two buttons we created:

public void bgMusicClicked(View button)
{
    // Play the background music
    SoundEngine.sharedEngine().playSound(_cocos2dContext, R.raw.background_music_aac, true);
}

public void sfxClicked(View button)
{
    // Play the sound effect
    SoundEngine.sharedEngine().playEffect(_cocos2dContext, R.raw.pew_pew_lei);
}

Give it a test!

It won’t stop playing!

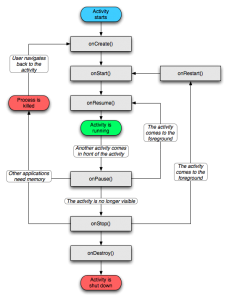
OK I may have let you walk into this one – the background music plays even when the activity is ‘closed’ or otherwise not being used by the user. This is very handy if you’re making an mp3 player, but not so useful when making a game. Fortunately we can fix this problem by hooking into a few events Android offers. As a refresher, here is the Activity Lifecycle in Android:

We need to cater for the activity being obscured by another activity, being hidden, and being closed down. The onResume, onPause, and onDestroy methods should be plenty for our needs. In onResume we’ll need to resume playback of the background sound if it was playing. onPause will pause the sound (if any) ready for resuming. When onDestroy is called we’ll close everything down and free up any applicable resources.

First, add the following fields to the activity class:

private boolean _soundPlaying = false;
private boolean _soundPaused = false;
private boolean _resumeSound = false;

We need to populate these fields as necessary when the user wants to play / pause the background music. Replace the bgMusicClicked method with:

public void bgMusicClicked(View button)
{
    // If we haven't started playing the sound - play it!
    if (!_soundPlaying)
    {
        SoundEngine.sharedEngine().playSound(_cocos2dContext, R.raw.background_music_aac, true);
        _soundPlaying = true;
    }
    else
    {
        // We've loaded the sound, now it's just a case of pausing / resuming
        if (!_soundPaused)
        {
            SoundEngine.sharedEngine().pauseSound();
            _soundPaused = true;
        }
        else
        {
            SoundEngine.sharedEngine().resumeSound();
            _soundPaused = false;
        }
    }
}

Now we only play the sound once, rather than starting fresh each time. We pause / resume the sound depending on whether it’s currently playing or not – your typical toggle pattern.
Now we’ll create the onPause handler:

@Override
public void onPause()
{
    super.onPause();

    // If the sound is loaded and not paused, pause it - but flag that we want it resumed
    if (_soundPlaying && !_soundPaused)
    {
        SoundEngine.sharedEngine().pauseSound();
        _soundPaused = true;
        _resumeSound = true;
    }
    else
        _resumeSound = false; // No sound playing, don't resume
}

In this method we check if the sound is playing, and if it is – whether it’s paused or not. If the sound is playing but it’s not paused, we pause it and request that it’s resumed at the earliest opportunity. If the sound isn’t playing or it’s paused, then we request that the sound isn’t resumed when the activity is.

Now it’s time for the onResume method:

@Override
public void onResume()
{
    super.onResume();

    // Resume playing sound only if it's loaded, paused and we want to resume it
    if (_soundPlaying && _soundPaused && _resumeSound)
    {
        SoundEngine.sharedEngine().resumeSound();
        _soundPaused = false;
    }
}

We check if the sound is playing, it’s paused, and a request is pending to resume the sound. If all of this is true (phew, that’s a lot of checking!) we resume the sound.

At this point we can run the app, and the audio will be handled properly. The user won’t be irritated by music playing when it shouldn’t, and our game can resume seamlessly when the user comes back. However, we haven’t yet implemented the onDestroy method – we never clean everything up.

Cleaning up our mess

Strictly speaking, cleaning up isn’t necessary in this app. Android will automatically reclaim the consumed resources when the app is destroyed. However, it’s always good to clean everything up anyway, if only so you know how to do it when it really is important. Add the following destroy method:

@Override
public void onDestroy()
{
    super.onDestroy();

    // Clean everything up
    SoundEngine.sharedEngine().realesAllSounds();
    SoundEngine.sharedEngine().realesAllEffects();

    // Completely shut down the sound system
    SoundEngine.purgeSharedEngine();
}

First we release all of the preloaded sounds and effects. You can selectively release individual sounds and effects if you need to. If your game is made up of multiple scenes with different audio in each, it’s a very good idea to release the audio you’re not using to save on memory.

Finally we shut down the sound engine itself. This isn’t really necessary, but it’s here for you to see how it can be done. If you have completely different areas in your game, you could feasibly want to have no trace of the SoundEngine between those scenes since the SoundEngine is a singleton by design.

And we’re done!

And that’s it; you now know everything you need to add basic audio to your Android Cocos2D games.

You can download the sample project here.

If you want more Cocos2D, don’t forget to check out the basic tutorial series starting here.

Posted by Dan in Android, Java, Tutorials, 3 comments

WP7Contrib Transitions Part 3 – LongListSelector

Make sure to read parts 1 and 2 first!

By now you’re probably loving the transitions on offer from WP7Contrib, but have found a slight problem in that the Turnstile Feather animation doesn’t work with the LongListSelector as provided by the WP7 Silverlight Toolkit. Fear not! For the opensource nature of WP7Contrib means we can extend the transitions functionality to support the LongListSelector as well as the standard ListBox. It should be noted that these changes aren’t perfect, and are largely a hack to add the functionality in as short a timespan as possible. You can download the demo app here to see the changes in action.

Let’s Have At It

First you need to download the WP7Contrib sourcecode, the code in this example is associated with revision 66430. You can try applying the changes to the latest revision, however note that things have most definitely moved on since 66430.

Open up the solution you’ve downloaded, then expand the ‘WP7Contrib.View.Transitions’ project. Expand ‘Animation’ and open up ‘TurnstileFeatherAnimator.cs’ and add the following properties to the class:

/// <summary>
/// Is BackwardIn or BackwardOut
/// </summary>
protected bool IsBackward { get; set; }

/// <summary>
/// Run the completion action first rather than on completion
/// </summary>
protected bool RunCompletionAnimationFirst { get; set; }

private Action _completionAnimationAction;
private Action _actualBeginAction;
private Action _completionAction;

Change the datatype of the ‘ListBox’ property to ‘Control’, this is so we can use either a ListBox or a LongListSelector without modifying client code.

The IsBackward property tells us if this is a Backward animation, this is required to fix some bugs in the way the LongListSelector handles itself when the page is restored when the user navigates backward.

The RunCompletionAnimationFirst property tells the animator to run the completion animation first or not. This is necessary because I perform a Turnstile animation on the RootElement to complete the feather effect. This turnstile animation needs to run first if the elements are animating in, and last if the elements are animating out.

The three Action properties are necessary to order animations in the correct order, and then perform the actual completion action. These properties will make more sense when you see the implementation details.

Now replace all of the methods in the ‘Public Methods’ region with the following:

/// <summary>
/// The begin.
/// </summary>
/// <param name="completionAction">
/// The completion action.
/// </param>
public override void Begin(Action completionAction)
{
    _completionAction = completionAction;
    completionAction = new Action(AnimationsCompleted);

    if (RunCompletionAnimationFirst)
    {
        _completionAnimationAction = ActualBegin;
        _actualBeginAction = completionAction;

        HideListItems();
        BeginCompletionAnimation();
    }
    else
    {
        _completionAnimationAction = completionAction;
        _actualBeginAction = BeginCompletionAnimation;

        ActualBegin();
    }
}

private void BeginCompletionAnimation()
{
    CompletionAnimation.RootElement = this.RootElement;
    CompletionAnimation.Begin(_completionAnimationAction);
}

private void HideListItems()
{
    if (ListBox is LongListSelector)
    {
        foreach (ContentPresenter li in ((LongListSelector)ListBox).GetItemsWithContainers(false, true).OfType<ContentPresenter>())
            li.Opacity = 0;
    }
    else if (ListBox is ListBox)
    {
        foreach (ContentControl li in ((ListBox)ListBox).GetVisualDescendants().OfType<ListBoxItem>().Where(lbi => IsOnCurrentPage(lbi) && lbi.IsEnabled))
            li.Opacity = 0;
    }
}

private void AnimationsCompleted()
{
    if (!this.IsBackward && ListBox is LongListSelector)
    {
        LongListSelector listBox = (LongListSelector)ListBox;

        listBox.UpdateLayout();
        listBox.SelectedItem = null;
    }

    _completionAction();

    _completionAnimationAction = null;
    _actualBeginAction = null;
    _completionAction = null;
}

private void ActualBegin()
{
    if (ListBox is ListBox)
        ActualBeginListBox();
    else if (ListBox is LongListSelector)
        ActualBeginLongListSelector();
    else
        throw new InvalidOperationException("ListBox must be of type System.Windows.Controls.ListBox or Microsoft.Phone.Controls.LongListSelector");

    base.Begin(_actualBeginAction);
}

private void ActualBeginListBox()
{
    Storyboard = new Storyboard();
    ListBox listBox = (ListBox)ListBox;

    double liCounter = 0;
    var listBoxItems = listBox.GetVisualDescendants().OfType<ListBoxItem>().Where(lbi => IsOnCurrentPage(lbi) && lbi.IsEnabled).ToList();

    if (HoldSelectedItem && Direction == Directions.Out && listBox.SelectedItem != null)
    {
        //move selected container to end
        var selectedContainer = listBox.ItemContainerGenerator.ContainerFromItem(listBox.SelectedItem);
        listBoxItems.Remove(selectedContainer as ListBoxItem);
        listBoxItems.Add(selectedContainer as ListBoxItem);
    }

    foreach (ContentControl li in listBoxItems)
    {
        GeneralTransform gt = li.TransformToVisual(RootElement);
        Point globalCoords = gt.Transform(new Point(0, 0));
        double heightAdjustment = li.Content is FrameworkElement ? ((li.Content as FrameworkElement).ActualHeight / 2) : (li.ActualHeight / 2);
        //double yCoord = globalCoords.Y + ((((System.Windows.FrameworkElement)(((System.Windows.Controls.ContentControl)(li)).Content)).ActualHeight) / 2);
        double yCoord = globalCoords.Y + heightAdjustment;

        double offsetAmount = (RootElement.ActualHeight / 2) - yCoord;

        PlaneProjection pp = new PlaneProjection();
        pp.GlobalOffsetY = offsetAmount * -1;
        pp.CenterOfRotationX = 0;
        li.Projection = pp;

        CompositeTransform ct = new CompositeTransform();
        ct.TranslateY = offsetAmount;
        li.RenderTransform = ct;

        var beginTime = TimeSpan.FromMilliseconds((FeatherDelay * liCounter) + InitialDelay);

        if (Direction == Directions.In)
        {
            li.Opacity = 0;

            DoubleAnimationUsingKeyFrames daukf = new DoubleAnimationUsingKeyFrames();

            EasingDoubleKeyFrame edkf1 = new EasingDoubleKeyFrame();
            edkf1.KeyTime = beginTime;
            edkf1.Value = Angle;
            daukf.KeyFrames.Add(edkf1);

            EasingDoubleKeyFrame edkf2 = new EasingDoubleKeyFrame();
            edkf2.KeyTime = TimeSpan.FromMilliseconds(Duration).Add(beginTime);
            edkf2.Value = 0;

            ExponentialEase ee = new ExponentialEase();
            ee.EasingMode = EasingMode.EaseOut;
            ee.Exponent = 6;

            edkf2.EasingFunction = ee;
            daukf.KeyFrames.Add(edkf2);

            Storyboard.SetTarget(daukf, li);
            Storyboard.SetTargetProperty(daukf, new PropertyPath("(UIElement.Projection).(PlaneProjection.RotationY)"));
            Storyboard.Children.Add(daukf);

            DoubleAnimation da = new DoubleAnimation();
            da.Duration = TimeSpan.FromMilliseconds(0);
            da.BeginTime = beginTime;
            da.To = 1;

            Storyboard.SetTarget(da, li);
            Storyboard.SetTargetProperty(da, new PropertyPath("(UIElement.Opacity)"));
            Storyboard.Children.Add(da);
        }
        else
        {
            li.Opacity = 1;

            DoubleAnimation da = new DoubleAnimation();
            da.BeginTime = beginTime;
            da.Duration = TimeSpan.FromMilliseconds(Duration);
            da.To = Angle;

            ExponentialEase ee = new ExponentialEase();
            ee.EasingMode = EasingMode.EaseIn;
            ee.Exponent = 6;

            da.EasingFunction = ee;

            Storyboard.SetTarget(da, li);
            Storyboard.SetTargetProperty(da, new PropertyPath("(UIElement.Projection).(PlaneProjection.RotationY)"));
            Storyboard.Children.Add(da);

            da = new DoubleAnimation();
            da.Duration = TimeSpan.FromMilliseconds(10);
            da.To = 0;
            da.BeginTime = TimeSpan.FromMilliseconds(Duration).Add(beginTime);

            Storyboard.SetTarget(da, li);
            Storyboard.SetTargetProperty(da, new PropertyPath("(UIElement.Opacity)"));
            Storyboard.Children.Add(da);
        }

        liCounter++;
    }
}

private void ActualBeginLongListSelector()
{
    Storyboard = new Storyboard();
    LongListSelector listBox = (LongListSelector)ListBox;

    double liCounter = 0;
    var listBoxItems = listBox.GetItemsWithContainers(false, true).OfType<ContentPresenter>().ToList();

    if (HoldSelectedItem && Direction == Directions.Out && listBox.SelectedItem != null)
    {
        //move selected container to end
        var listBoxItemsInView = listBox.GetItemsWithContainers(true, true).OfType<ContentPresenter>();
        var selectedContainer = listBoxItemsInView.Where(i => i.Content == listBox.SelectedItem).FirstOrDefault();

        if (selectedContainer != null)
        {
            listBoxItems.Remove(selectedContainer);
            listBoxItems.Add(selectedContainer);
        }
    }

    foreach (ContentPresenter li in listBoxItems)
    {
        GeneralTransform gt = li.TransformToVisual(RootElement);
        Point globalCoords = gt.Transform(new Point(0, 0));
        //double heightAdjustment = li.Content is FrameworkElement ? ((li.Content as FrameworkElement).ActualHeight / 2) : (li.ActualHeight / 2);
        double heightAdjustment = li.ActualHeight / 2;
        //double yCoord = globalCoords.Y + ((((System.Windows.FrameworkElement)(((System.Windows.Controls.ContentControl)(li)).Content)).ActualHeight) / 2);
        double yCoord = globalCoords.Y + heightAdjustment;

        double offsetAmount = (RootElement.ActualHeight / 2) - yCoord;

        PlaneProjection pp = new PlaneProjection();
        pp.GlobalOffsetY = offsetAmount * -1;
        pp.CenterOfRotationX = 0;
        li.Projection = pp;

        CompositeTransform ct = new CompositeTransform();
        ct.TranslateY = offsetAmount;
        li.RenderTransform = ct;

        var beginTime = TimeSpan.FromMilliseconds((FeatherDelay * liCounter) + InitialDelay);

        if (Direction == Directions.In)
        {
            li.Opacity = 0;

            DoubleAnimationUsingKeyFrames daukf = new DoubleAnimationUsingKeyFrames();

            EasingDoubleKeyFrame edkf1 = new EasingDoubleKeyFrame();
            edkf1.KeyTime = beginTime;
            edkf1.Value = Angle;
            daukf.KeyFrames.Add(edkf1);

            EasingDoubleKeyFrame edkf2 = new EasingDoubleKeyFrame();
            edkf2.KeyTime = TimeSpan.FromMilliseconds(Duration).Add(beginTime);
            edkf2.Value = 0;

            ExponentialEase ee = new ExponentialEase();
            ee.EasingMode = EasingMode.EaseOut;
            ee.Exponent = 6;

            edkf2.EasingFunction = ee;
            daukf.KeyFrames.Add(edkf2);

            Storyboard.SetTarget(daukf, li);
            Storyboard.SetTargetProperty(daukf, new PropertyPath("(UIElement.Projection).(PlaneProjection.RotationY)"));
            Storyboard.Children.Add(daukf);

            DoubleAnimation da = new DoubleAnimation();
            da.Duration = TimeSpan.FromMilliseconds(0);
            da.BeginTime = beginTime;
            da.To = 1;

            Storyboard.SetTarget(da, li);
            Storyboard.SetTargetProperty(da, new PropertyPath("(UIElement.Opacity)"));
            Storyboard.Children.Add(da);
        }
        else
        {
            li.Opacity = 1;

            DoubleAnimation da = new DoubleAnimation();
            da.BeginTime = beginTime;
            da.Duration = TimeSpan.FromMilliseconds(Duration);
            da.To = Angle;

            ExponentialEase ee = new ExponentialEase();
            ee.EasingMode = EasingMode.EaseIn;
            ee.Exponent = 6;

            da.EasingFunction = ee;

            Storyboard.SetTarget(da, li);
            Storyboard.SetTargetProperty(da, new PropertyPath("(UIElement.Projection).(PlaneProjection.RotationY)"));
            Storyboard.Children.Add(da);

            da = new DoubleAnimation();
            da.Duration = TimeSpan.FromMilliseconds(10);
            da.To = 0;
            da.BeginTime = TimeSpan.FromMilliseconds(Duration).Add(beginTime);

            Storyboard.SetTarget(da, li);
            Storyboard.SetTargetProperty(da, new PropertyPath("(UIElement.Opacity)"));
            Storyboard.Children.Add(da);
        }

        liCounter++;
    }
}

This is a lot of code! Fortunately this is the only major change to add the functionality we need. In the Begin method we set up our actions mentioned in the properties earlier. The completionAction is the action performed when all animations are completed, just like the original implementation. _actualBeginAction is the action the ActualBegin() method will execute upon completion. This will either be the completionAction, or an action to trigger the completion animation.

The completion animation is badly named, since it can run either at the start or the end of the feather animation.

After the actions are set up, we call the first animation. The first animation will then call the second animation, which will call the completionAction. So as an overview the method calls will be:

Completion animation first: Begin() > BeginCompletionAnimation() > HideListItems() > ActualBegin() > AnimationsCompleted() > CompletionAction()
Completion animation last: Begin() > ActualBegin() > BeginCompletionAnimation() > AnimationsCompleted() > CompletionAction()

We have an additional call to HideListItems() if the completion animation is run first. This is because the screen pivots in and then animates the list. The problem is if the list is visible from the outset you would see the list turnstile-in, then suddenly disappear and animate.

ActualBegin() is where we perform the actual Feather animation. We check the type of control passed in, and trigger the correct animation code. The code is largely the same between the two except for a little setup where we use the methods provided by the LongListSelector to get the containers for the visible elements. This means implementation on the surface is actually easier than with the ListBox where we have to work out which elements are visible.

AnimationsCompleted()

So why do we have an additional method that we run at the end of the animation? This is neccesary to fix a bug in the LongListSelector where the control won’t respond to input from the user after the animation is completed. We call UpdateLayout() to trigger the LongListSelector to sort itself out. Finally we set the SelectedItem to null. This is an implementation detail I’ve found useful for myself – however, you may well want to remove this line. In essence by leaving the item selected, it is the last item to animate off of the list. However, I never want the item to remain selected, so I clear the selection automatically. This isn’t ideal behaviour for a professional control, so don’t go duplicating this kind of hideous hack in your own controls!

Finishing Up

Now we need to tweak the animators themselves to support the new functionality. Update the animators as follows:

public TurnstileFeatherBackwardInAnimator()
{
    this.IsBackward = true;
    this.Duration = 350;
    this.Angle = 50;
    this.FeatherDelay = 50;
    this.Direction = Directions.In;
    this.CompletionAnimation = new TurnstileBackwardInAnimator();
    this.RunCompletionAnimationFirst = true;
}
public TurnstileFeatherBackwardOutAnimator()
{
    this.IsBackward = true;
    this.Duration = 250;
    this.Angle = -80;
    this.FeatherDelay = 50;
    this.Direction = Directions.Out;
    this.CompletionAnimation = new TurnstileBackwardOutAnimator();
}
public TurnstileFeatherForwardInAnimator()
{
    this.Duration = 350;
    this.Angle = -80;
    this.FeatherDelay = 50;
    this.Direction = Directions.In;
    this.CompletionAnimation = new TurnstileForwardInAnimator();
    this.RunCompletionAnimationFirst = true;
}
public TurnstileFeatherForwardOutAnimator()
{
    this.Duration = 250;
    this.Angle = 50;
    this.FeatherDelay = 50;
    this.Direction = Directions.Out;
    this.HoldSelectedItem = true;
    this.CompletionAnimation = new TurnstileForwardOutAnimator();
}

And you’re done!

LongListSelector Scrolling

OK, I may have lied a little about you being done. The LongListSelector has one final issue when we animate, it doesn’t retain its scroll position. The easiest way to solve this is to sub-class AnimatedBasePage and perform the necessary ‘tweaks’ to the selector in the AnimationsComplete() method. But before I show you the code, you’ll need ‘Linq to Visual Tree’ by Colin Eberhardt. The code file is already included in the demo app. Now you’ve got the necessary code, you can add the AnimationsComplete() method to your newly created page class:

public class TransitionPage : AnimatedBasePage
{
    protected override void AnimationsComplete(AnimationType animationType)
    {
        if (animationType == AnimationType.NavigateBackwardIn || animationType == AnimationType.NavigateBackwardOut)
        {
            foreach (LongListSelector listBox in this.Descendants<LongListSelector>())
            {
                listBox.UpdateLayout();

                if (listBox.SelectedItem != null)
                    listBox.ScrollTo(listBox.SelectedItem);
                else
                {
                    object firstObj = listBox.GetItemsInView().Where(i => i != null).FirstOrDefault();

                    if (firstObj != null)
                        listBox.ScrollTo(firstObj);
                }
            }
        }

        base.AnimationsComplete(animationType);
    }
}

This code picks up if the animation is a backward one, and will automatically loop through all of the LongListSelectors (if you have multiple selectors across PivotItems or PanoramaItems they’ll all lose their position) and corrects their position.

Am I actually done now?

Yes, yes you are! It’s been a long road just to add a Feather Turnstile animation to a LongListSelector, but I believe it’s well worth it. The effect looks great and adds a great deal of professionalism to your app.

This concludes the ‘Transitions’ series of blog posts. As always, you can download the sample app here.

Issues

As with all things, there are a few gotchas. The first is the dreaded ‘AG_E_PARSER_BAD_TYPE’ error. This error can occur when you subclass AnimatedBasePage. To this date I still haven’t resolved the issue – it’s very inconsistent and affects some projects but not others. The easiest workaround is to use extension methods and call those from each individual page. It’s far from ideal and a simply hideous hack – but it does work.

The other issue you may get is a page simply refusing to navigate to another. Chances are you’re requesting a navigation too quickly – the page hasn’t finished initialising. The easiest solution in this case is to use the ‘OneShotDispatcherTimer’ from the Kawagoe Toolkit. You can use the timer like so:

OneShotDispatcherTimer timer = new OneShotDispatcherTimer()
{
    Duration = new TimeSpan(0, 0, 1)
};

timer.Fired += (object sender, EventArgs e) => NavigationService.Navigate(new Uri("/NextPage.xaml", UriKind.Relative));
timer.Start();
Posted by Dan in C#, Tutorials, Windows Phone, 0 comments

WP7Contrib Transitions Part 2 – More Advanced Transitions

Make sure to read part 1 first!

WP7Contrib offers numerous transitions, these include:

Continuum
The selected item in a list will animate out, and the next page will have the heading animate in. The reverse happens on returning to the original page. This is a great effect if the user is selecting a specific item to view more detail.

Rotate
The page rotates in/out. A bit ostentatious for my tastes.

Slide
There are various slide animations offered, these mimic the kinds of transitions you get with iOS. SlideUp and SlideDown are ideal for popups.

Turnstile
The default transition we all know and love

Turnstile Feather
My personal favourite, and one we’ll see a lot more of in Part 3. This is the same as Turnstile, except it will animate out each element in a list from top to bottom. This is the same effect you see on the phone home screen when you select an app to launch.

If you want to see all of the transitions on offer, download the WP7Contrib source code and open the ‘PageTransitions’ solution within the ‘Spikes’ folder. This provides a demo of all of the transitions on offer within WP7Contrib.

Let’s Play

Let’s try the Turnstile Feather and Continuum transitions out. You’ll need a project with a screen that’s a ListBox, if you don’t have one, download the demo app from the first part of this series. If you want to see the demo right now, click here to download the demo app for part 2.

Go into the code-behind for the page with the ListBox and add the following override:

protected override AnimatorHelperBase GetAnimation(AnimationType animationType, Uri toOrFrom)
{
    return base.GetAnimation(animationType, toOrFrom);
}

This is an extremely powerful override that allows you to fully customise the kind of animation used when the page is navigated to or from. The first parameter is the type of animation you need to return. The second parameter is the uri for the page that the user is either navigating to, or navigating from. If ever you’re not sure, use the base implementation which will almost always provide a Turnstile animation. The Turnstile animation is a good fall-back animation, so it’s often wise to handle specific cases yourself, and let the base implementation handle the rest.

Now you could run the app right now and it’ll work, but we want to trigger a Continuum transition on the way out, and a Turnstile Feather animation on the way back in. To do this, we need to tell which animations we want WP7Contrib to use:

protected override AnimatorHelperBase GetAnimation(AnimationType animationType, Uri toOrFrom)
{
    switch (animationType)
    {
        case AnimationType.NavigateForwardOut:
        case AnimationType.NavigateBackwardOut:
            return this.GetContinuumAnimation(TheListBox, animationType);

        case AnimationType.NavigateBackwardIn:
            return new TurnstileFeatherBackwardInAnimator()
            {
                ListBox = TheListBox,
                RootElement = LayoutRoot
            };

        case AnimationType.NavigateForwardIn:
            return new TurnstileFeatherForwardInAnimator()
            {
                ListBox = TheListBox,
                RootElement = LayoutRoot
            };
    }

    return base.GetAnimation(animationType, toOrFrom);
}

Notice we let WP7Contrib handle any animations we don’t explicitly handle ourselves. This ensures if the app is extended in the future the user experience isn’t unduly affected.

The Continuum animation has three properties, a StoryBoard, RootElement and LayoutRoot. This allows you to customise the animation applied to the selected element, however most of the time the default animation is the correct one. For this reason we get WP7Contrib to create the animation for us by calling GetContinuumAnimation.

The Turnstile Feather animation requires the ListBox you wish to animate and the RootElement. The RootElement in this case is the same element you set as the AnimationContext. You could set a different RootElement if required, but it’s unlikely you’ll ever need to do this.

Now run your app and admire your handy work! You can download a fully functional demo project here.

Want yet more? Click here for part 3.

Posted by Dan in C#, Tutorials, Windows Phone, 6 comments

WP7Contrib Transitions – Easy Page Transitions for Windows Phone 7, Part 1

WP7Contrib offers an alternative to the WP7 Silverlight Toolkit transitions, and in my humble opinion, the alternative is significantly better in this case. The Silverlight toolkit offers easy integration of transitions via a little XAML markup and a minor change to the root frame. The biggest problem with the toolkit transitions are that they’re slow and exceedingly memory intensive with complex layouts consuming copious amounts of memory. In my latest app the transitions alone could use up to 40MB. Don’t forget, there is a 90MB limit for all apps when operating on devices with 256MB RAM.

WP7Contrib offers an alternative that’s code-based rather than markup-based. This may be preferable, or it may not depending on your internal setup. Personally for something like transitions I prefer code-based so transitions are the ‘default’ rather than the exception.

The greatest thing about WP7Contrib Transitions, is that they’re a doddle to implement if you just want to have transitions between pages. In WP7 the ‘standard’ transition is the turnstile transition – this is where each screen appears and disappears as if they’re pages in a book. Here’s how to get this transition into your app:

Simple Transitions

If you want to see the transitions for yourself, click here to download the demo app. Otherwise , download WP7Contrib and compile it. Once you’ve done this, add the WP7Contrib.View.Controls and WP7Contrib.View.Transitions assemblies to your project References. These are the only two assemblies required to get transitions working, and I prefer to include as few assemblies as possible to keep load times fast.

Next you need to make some minor tweaks to every page you want to animate. Add the following namespace to the XAML file:

xmlns:animation="clr-namespace:WP7Contrib.View.Transitions.Animation;assembly=WP7Contrib.View.Transitions"

Next change the page type to ‘animation:AnimatedBasePage’. To do this the first line of your XAML file should be:

<animation:AnimatedBasePage

And the last line should be:

</animation:AnimatedBasePage>

Now go into the code-behind and change the base type of your page to ‘AnimatedBasePage’. The final change is to add the following line into the constructor:

AnimationContext = LayoutRoot;

This tells WP7Contrib that your ‘root element’ is ‘LayoutRoot’. You can set any element to be the AnimationContext, this is useful if you want to only animate a sub-area of the page between pages. Generally speaking you’ll want to target LayoutRoot, or whichever element you’ve got containing all of your UI. This is the big difference between WP7Contrib and the WP7 Toolkit which targets the page frame itself.

Compile and run your app – you should find your pages automatically use the turnstile transition. Don’t forget you can download the demo app here.

Personally, I can’t recommend WP7Contrib transitions enough. They have a few caveats, but the performance improvements and memory savings are substantial. I hope that this article has given you a taster of the transitions and how easy they are to implement.

Hungry for more? Click here to view part 2 where we cover additional transitions.

Posted by Dan in C#, Tutorials, Windows Phone, 6 comments

How To Make A Simple Android Game with Cocos2D Part 2 – Rotating Turrets

Update: This code is using an outdated version of the Cocos2D port. It’ll still work if you use the sample download linked at the end – but it’s using outdated API calls. Unfortunately I don’t have time to update the tutorial to the new release of Cocos2D. Sorry guys 🙁

This is the second tutorial in the Simple Android Cocos2D Game Tutorial series, originally written by Ray Wenderlich for the iPhone. This one builds on the first tutorial by replacing the ninja with a rotating turret, and the projectiles with cannon balls.

Getting Set Up

Ideally you’ll have followed the first tutorial, in which case you can continue from where you left of. Failing that you can download the code from the previous tutorial and use that as your base – however, I highly recommend starting from the beginning.

Now download a new player sprite and projectile sprite, put both in the ‘assets’ folder of your project. You’ll need to update your code to use these new sprites, so without further ado let’s get modifying. In the GameLayer constructor, update the player line with the following:

CCSprite player = CCSprite.sprite("Player2.png");

Next update the ccTouchesEnded method, find where you create the projectile sprite and replace with the following:

CCSprite projectile = CCSprite.sprite("Projectile2.png");

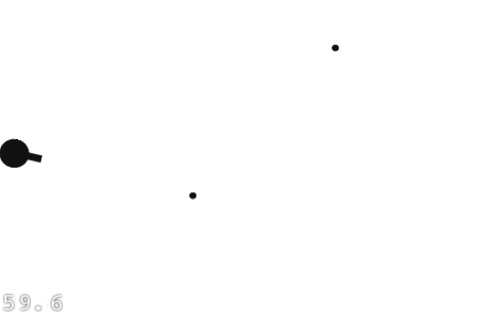
Compile and run your project, it should now look like the following screenshot:


You’ve probably noticed it doesn’t look quite right, the turret doesn’t rotate with the projectile direction. Let’s fix that now.

Rotating To Shoot

Before we can rotate the turret, we need to store a reference to the player sprite so we can rotate it elsewhere in the program. In the GameLayer class, add the following field:

protected CCSprite _player;

Next we need to use the new field, update the Constructor instantiation code to the following:

_player = CCSprite.sprite("Player2.png");
_player.setPosition(CGPoint.ccp(_player.getContentSize().width / 2.0f, winSize.height / 2.0f));

addChild(_player);

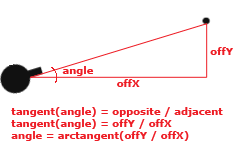
Rotating the turret with the projectile is easier said than done, we’re forced to use a little maths to work out the angle. For this we’ll use a little Trigonometry, which means remembering back to SOH CAH TOA. In this example we’ll be using the ‘TOA’, or Tangent of an angle is equal to the Opposite over the Adjacent. The following illustration should help:

As you can see from the graphic, the angle we want to rotate to is equal to the arctangent of the Y offset divided by the X offset. Seems easy enough right? Unfortunately there are two caveats you must be aware off before we can go implementing general geometry in our games:

  1. The maths functions in Java use and return radians, not degrees
  2. Cocos2D rotations are clockwise rather than anti-clockwise, which is the opposite to what is expected, as shown in the graphic below:

Fortunately the solutions are very simple. The Java Math class provides a method to convert to and from radians. The second solution is to invert the angle by multiplying by negative 1. So for example 20° x -1 = -20°. This will effectively convert the counter-clockwise rotation to the clockwise rotation Cocos2D expects:

Let’s put what we’ve learned into practice. Add the following code to the ccTouchesEnded code, just before we play the sound effect:

// Determine angle to face
double angleRadians = Math.atan((double)offRealY / (double)offRealX);
double angleDegrees = Math.toDegrees(angleRadians);
double cocosAngle = -1 * angleDegrees;
_player.setRotation((float)cocosAngle);

You may have noticed we’re using doubles rather than floats. According to Google doubles are just as fast as floats with the only trade-off being increased memory consumption. Since there is no float version of Math.atan or Math.toDegrees, it’s better to stick with doubles so we don’t waste CPU cycles converting between double and float repeatedly.

Now compile and run, and you should have a rotating turret!

Rotate Then Shoot

We’ve got a great game here, but it could be better. The turret rotates instantly, which is unlikely given we’re firing cannon balls. It would be much better for immersion and realism if we smoothly rotate the turret to its new direction. This will take a little refactoring.

Add the following field to the GameLayer class:

protected CCSprite _nextProjectile;

Replace the projectile instantiation code in ccTouchesEnded with the following:

_nextProjectile = CCSprite.sprite("Projectile2.png");

Next replace all occurrences of ‘projectile’ with ‘_nextProjectile’ within ccTouchesEnded. While you’re replacing these occurrences, make sure to delete the following lines:

addChild(projectile);
_projectiles.add(projectile);

Update the turret rotation code (also in ccTouchesEnded) with the following:

// Determine angle to face
double angleRadians = Math.atan((double)offRealY / (double)offRealX);
double angleDegrees = Math.toDegrees(angleRadians);
double cocosAngle = -1 * angleDegrees;
double rotationSpeed = 0.5 / Math.PI;
double rotationDuration = Math.abs(angleRadians * rotationSpeed);
_player.runAction(CCSequence.actions(
		CCRotateTo.action((float)rotationDuration, (float)cocosAngle),
		CCCallFunc.action(this, "finishShoot")));

This code will rotate the turret with a rotation speed of half a second (0.5) for half a circle’s worth of rotation (since full circle in radians is 2 PI, a half circle is 1 PI).
Once the rotation is complete, we then call a method called ‘finishShoot’. Since we haven’t created that method, we should create it now:

public void finishShoot()
{
	addChild(_nextProjectile);
	_projectiles.add(_nextProjectile);
}

This method adds the projectile to the game. Since it’s called once the turret has finished rotating we can guarantee that projectiles will only fire once the turret is in position.
That’s it, we’re all finished! Have a play, and enjoy your handiwork.

What’s Next?

You can download the full source code here.

In the future I should be porting Ray’s final part of the series, but in the meantime you could have a look at his tutorial and see if you can port it yourself!

Posted by Dan in Java, Programming, Tutorials, 31 comments

How To Make A Simple Android Game with Cocos2D

Update: This code is using an outdated version of the Cocos2D port. It’ll still work if you use the sample download linked at the end – but it’s using outdated API calls. Unfortunately I don’t have time to update the tutorial to the new release of Cocos2D. Sorry guys 🙁

Cocos2D is a fantastic library / game engine for numerous platforms from PCs to smart phones. It supports the vast majority of the features necessary to make almost any 2D-based game, it even includes a fully-featured physics engine!

As part of learning Cocos2D for Android I followed Ray Wenderlich’s tutorials for the iPhone port of Cocos2D. Of course we’re dealing with Android here, so here is his tutorial recreated for Android. Ray deserves all credit for this tutorial – the tutorial is originally his, this is merely a port to Android. Credit should also go to Sketchydroide for his basic template for Cocos2D on Android.

Downloading and Installing Cocos2D

I’m going to assume you’ve already got the Android SDK installed, along with Eclipse. If not, you can follow the guides at Google. You’ll also need to test with a real device, the emulator is far too slow to test Cocos2D applications, even one as simple as this tutorial. I’m also going to assume you know Java, otherwise you’re going to get lost very quickly. There are plenty of Java tutorials out there, don’t worry we’ll wait here while you learn. The basics of Android (such as what Activities are, etc.) are helpful to know, but not critical.

First you need to download cocos2d-android-1. I’m going to assume you’re using the pre-compiled library (the .jar), although you’re welcome to include the full source code if you wish. In fact when you’re developing on your own, the source code is a better option since you gain full documentation along with the ability to tweak the code should you need to.

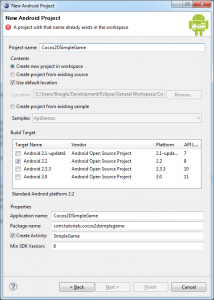
Open up Eclipse and create a new Android Project:

Now you need to copy the cocos2d-android.jar file into the ‘libs’ folder of your project. If the folder doesn’t exist, create it.
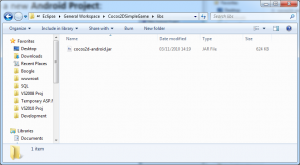
Go back to Eclipse, right-click on your project and select ‘Build Path/Add External Archives’.
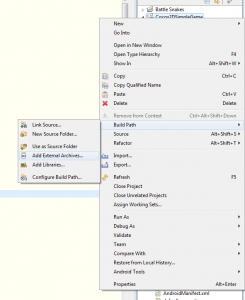
Browse to where you saved the .jar file and select ‘open’.

Next download fps_images.png and put into the assets folder of your project. You are now setup with Cocos2D!

Initial Setup

Next you need to put some code into your default activity (SimpleGame) so that you can start making your game. At the top of the class add a protected field:

protected CCGLSurfaceView _glSurfaceView;

At this point Eclipse may be moaning about the line you’ve just added. This is because you haven’t imported the namespace. The easiest way to do this is to press CTRL+SHIFT+O. Any time you use a new class, try pressing this key combination any time a completed line has an error to do with missing identifiers. Next replace the onCreate method with the following:

@Override
public void onCreate(Bundle savedInstanceState)
{
	super.onCreate(savedInstanceState);

	requestWindowFeature(Window.FEATURE_NO_TITLE);
	getWindow().setFlags(WindowManager.LayoutParams.FLAG_FULLSCREEN, WindowManager.LayoutParams.FLAG_FULLSCREEN);
	getWindow().setFlags(WindowManager.LayoutParams.FLAG_KEEP_SCREEN_ON, WindowManager.LayoutParams.FLAG_KEEP_SCREEN_ON);

	_glSurfaceView = new CCGLSurfaceView(this);

	setContentView(_glSurfaceView);
}}

This sets up the OpenGL surface for Cocos2D to utilise. We set some flags to ensure we always have a fullscreen view, then display the view to the user.

Replace the onStart method with the following:

@Override
public void onStart()
{
	super.onStart();

	CCDirector.sharedDirector().attachInView(_glSurfaceView);

	CCDirector.sharedDirector().setDisplayFPS(true);

	CCDirector.sharedDirector().setAnimationInterval(1.0f / 60.0f);
}

This is the initial setup for Cocos2D. First we tell Cocos2D which surface to render to (the OpenGL surface we set up earlier). We then ask Cocos2D to display the FPS and to run at 60fps. Note that the 60fps is our animation interval, not the framerate of the application itself which is often limited by the device.

Finally add the following extra overrides:

@Override
public void onPause()
{
	super.onPause();

	CCDirector.sharedDirector().pause();
}

@Override
public void onResume()
{
	super.onResume();

	CCDirector.sharedDirector().resume();
}

@Override
public void onStop()
{
	super.onStop();

	CCDirector.sharedDirector().end();
}

These notify Cocos2D with what’s going on with the device – such as when the user has switched to another application or the game is being stopped by the OS.

This is all the setup we really need. You can run the game now, but it won’t display anything at this early stage (we haven’t even set up a hello world scene!).

Adding a Sprite

Sprites are small images in 2D games that move about. These can be characters, projectiles or even clouds. In this game we’ll have three separate types of sprite: Player, target (enemy), and projectile. First we need a graphic to use! You can either create your own, or use the tasty graphics provided by Ray Wenderlich’s wife: Player, Projectile, Target. Place your sprite graphics within the ‘assets’ folder of your project.

Now we need to place the sprite on the game screen. Cocos2D has an inverted coordinate system to what you’re used to – the origin is the bottom left of the screen. So as X increases you head to the right of the screen. As Y increases you go up the screen. Additionally by default the origin / anchor point of sprites is in the centre. The coordinate system is the same regardless of the platform you run Cocos2D on. The following graphic should help you visualise the coordinate system of Cocos2D:
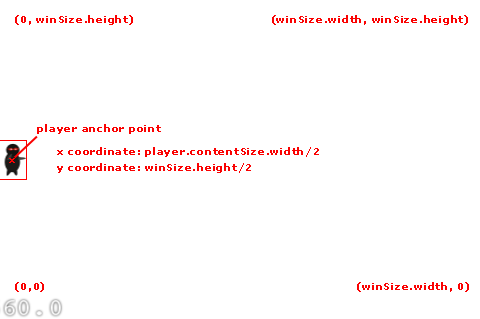
Enough boring theory, let’s get some code down! Add a new class to your project, call it ‘GameLayer’ and make it extend ‘CCLayer’. Add the following static method at the top of the class declaration:

public static CCScene scene()
{
	CCScene scene = CCScene.node();
	CCLayer layer = new GameLayer();

	scene.addChild(layer);

	return scene;
}

Now add a default constructor:

protected GameLayer()
{
	CGSize winSize = CCDirector.sharedDirector().displaySize();
	CCSprite player = CCSprite.sprite("Player.png");

	player.setPosition(CGPoint.ccp(_player.getContentSize().width / 2.0f, winSize.height / 2.0f));

	addChild(_player);
}

At this point it may be worth a quick look at the earlier diagram to see exactly why we’ve chosen the coordinates we have for the player.

Now before we can see this running, we first need to tell Cocos2D to run our new scene & layer. Go back to SimpleGame.java and add the following code to the end of the onStart method:

CCScene scene = GameLayer.scene();
CCDirector.sharedDirector().runWithScene(scene);

Now run the application and admire your handywork!

Oh dear, the black character is barely visible on the black background! Never mind, we can modify the background colour of the layer easily by inheriting from CCColorLayer instead of CCLayer:

public class GameLayer extends CCColorLayer

Update the scene() static method’s layer declaration to:

CCColorLayer layer = new GameLayer(ccColor4B.ccc4(255, 255, 255, 255));

Finally, update the constructor to the following:

protected GameLayer(ccColor4B color)
{
	super(color);

Now when you run the application you should have a nice white background.
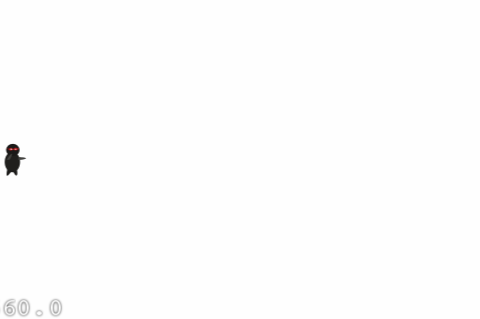
Moving Targets

While it’s cool to display a single ninja, because well, ninjas are cool – we don’t yet have much of a game. What we really need are some targets for our ninja to throw stars at. While we’re at it we might as well make them move to give them a fighting chance. What we’ll do is create the targets off the screen to the right, then have them move to the left of the screen at varying speeds. Add the following method after the constructor:

protected void addTarget()
{
	Random rand = new Random();
	CCSprite target = CCSprite.sprite("Target.png");

	// Determine where to spawn the target along the Y axis
	CGSize winSize = CCDirector.sharedDirector().displaySize();
	int minY = (int)(target.getContentSize().height / 2.0f);
	int maxY = (int)(winSize.height - target.getContentSize().height / 2.0f);
	int rangeY = maxY - minY;
	int actualY = rand.nextInt(rangeY) + minY;

	// Create the target slightly off-screen along the right edge,
	// and along a random position along the Y axis as calculated above
	target.setPosition(winSize.width + (target.getContentSize().width / 2.0f), actualY);
	addChild(target);

	// Determine speed of the target
	int minDuration = 2;
	int maxDuration = 4;
	int rangeDuration = maxDuration - minDuration;
	int actualDuration = rand.nextInt(rangeDuration) + minDuration;

	// Create the actions
	CCMoveTo actionMove = CCMoveTo.action(actualDuration, CGPoint.ccp(-target.getContentSize().width / 2.0f, actualY));
	CCCallFuncN actionMoveDone = CCCallFuncN.action(this, "spriteMoveFinished");
	CCSequence actions = CCSequence.actions(actionMove, actionMoveDone);

	target.runAction(actions);
}

The code is rather verbose to make it as easy to read & understand as possible. Near the bottom we’ve introduced a new concept: Actions. Actions are a very accessible way of getting sprites to do things without constant babysitting. You can get sprites to move, rotate, fade, jump, etc. We use three different actions in this method:

  • CCMoveTo: The CCMoveTo action moves a sprite from its current position to a new one. In this case we’re moving the sprite from just beyond the right edge of the screen to just beyond the left edge of the screen (remember the origin of a sprite is the centre, hence why we divide the width by two). The duration is specified in seconds between 2 and 4. As an exercise, try changing the type from int to float so we aren’t restricted to whole seconds.
  • CCCallFuncN: The CCCallFuncN action allows you to specify a callback. The ‘N’ means this action allows you to specify a parameter.
  • CCSequence: This is a rather special action in that it doesn’t do anything itself. Instead it lets you run a sequence of actions, one after the other in a linear fashion. We use this so that we can move the sprite, then when the movement has finished call our callback.

The eagle-eyed may have noticed that we have a callback, yet the method doesn’t yet exist! We better correct that right now, add the following method to our class:

public void spriteMoveFinished(Object sender)
{
	CCSprite sprite = (CCSprite)sender;
	this.removeChild(sprite, true);
}

This method will remove the sprite when it has finished animating to the left of the screen. The second parameter is to ‘cleanup’ the sprite, this means it is completely unloaded and we get the memory back. In a real game you would only clean up a sprite as a last resort, re-using a sprite is much better from a performance perspective. We’re going down the wasteful route to make the concept of the game as simple as possible – simple is good when learning!

Now we have code to create and animate targets, but we never call this code! What we’ll do is spawn a new target every second automatically giving the ninja plenty of shuriken practice. Add the following line of code to the bottom of the constructor:

this.schedule("gameLogic", 1.0f);

Also add the following new method to the class:

public void gameLogic(float dt)
{
	addTarget();
}

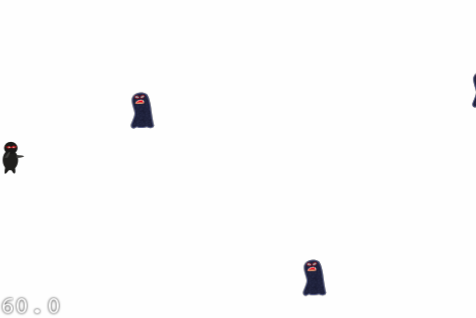
Now run the application and we should have some action:
Shooting Projectiles

I like to be able to shoot my targets, so let’s add some shooting! We’re going make things simple by having the user tap to shoot, where you tap is where the projectile goes.

We’ll use CCMoveTo to animate the projectile just like how we animated the targets. The problem is, CCMoveTo requires a destination to move to, but we can’t use the tap location since that means the projectile would stop in the middle of the screen. What we need to do is use the tap as a direction, rather than a destination.
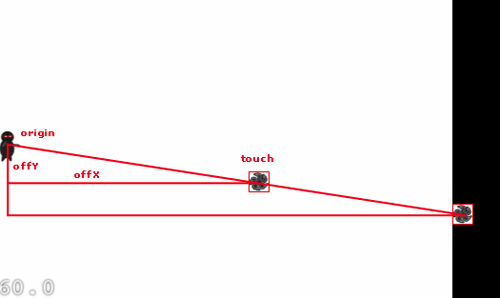
This should look familiar to anyone who didn’t fall asleep in maths class – Pythagoras! Now before we fall asleep with yet more theory, let’s start coding. In the constructor add the following line:

this.setIsTouchEnabled(true);

Next add the following method to the class:

@Override
public boolean ccTouchesEnded(MotionEvent event)
{
	// Choose one of the touches to work with
	CGPoint location = CCDirector.sharedDirector().convertToGL(CGPoint.ccp(event.getX(), event.getY()));

	// Set up initial location of projectile
	CGSize winSize = CCDirector.sharedDirector().displaySize();
	CCSprite projectile = CCSprite.sprite("Projectile.png");

	projectile.setPosition(20, winSize.height / 2.0f);

	// Determine offset of location to projectile
	int offX = (int)(location.x - projectile.getPosition().x);
	int offY = (int)(location.y - projectile.getPosition().y);

	// Bail out if we are shooting down or backwards
	if (offX <= 0)
		return true;

	// Ok to add now - we've double checked position
	addChild(projectile);

	// Determine where we wish to shoot the projectile to
	int realX = (int)(winSize.width + (projectile.getContentSize().width / 2.0f));
	float ratio = (float)offY / (float)offX;
	int realY = (int)((realX * ratio) + projectile.getPosition().y);
	CGPoint realDest = CGPoint.ccp(realX, realY);

	// Determine the length of how far we're shooting
	int offRealX = (int)(realX - projectile.getPosition().x);
	int offRealY = (int)(realY - projectile.getPosition().y);
	float length = (float)Math.sqrt((offRealX * offRealX) + (offRealY * offRealY));
	float velocity = 480.0f / 1.0f; // 480 pixels / 1 sec
	float realMoveDuration = length / velocity;

	// Move projectile to actual endpoint
	projectile.runAction(CCSequence.actions(
			CCMoveTo.action(realMoveDuration, realDest),
			CCCallFuncN.action(this, "spriteMoveFinished")));

	return true;
}

What we are doing here is first enabling touch support. We’re telling Cocos2D that we are ready to handle touches for the current layer. Next we add code to handle touches from the user.

First we get the coordinates of the touch itself, and convert to the Cocos2D coordinate system. This method should work regardless of the orientation of the device.

Next we create the sprite and position it over the ninja. We then work out where the projectile should move to by extending the tap off the screen. This is done by getting the X and Y offset of the tap to the projectile’s starting position. We then get the ratio of Y to X, and simply scale the touch Y coordinate to match the scaled up X coordinate (which is just off the screen). The only problem with a simple algorithm like this is that the projectile must reach the right edge of the screen before it’s cleaned up, the projectile could leave the screen (top or bottom) long before it hits the right edge. There are solutions to this problem, but they’re beyond the scope of this tutorial.

After working out the destination, we need to work out the duration of the movement – we can’t have projectiles taking different amounts of time just because of the angle they’re shot at. To solve this problem we use Pythagoras to work out the distance the projectile needs to travel, then divide that by the velocity we want. This is because velocity = distance over time, or by re-arranging: time = distance over velocity.

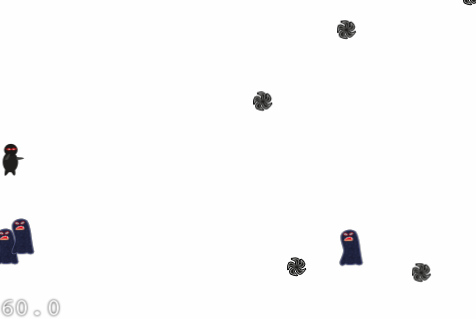
Finally we run the actions on the projectile. Run the application and you should be able to start shooting shurikens!
Collision Detection

It’s no good if you can shoot shurikens, but they don’t actually do anything! To solve this problem we need to add some collision detection. To keep things simple we’ll use simple bounding box collision detection rather than the other more exotic methods Cocos2D provides.

To be able to run collision detection we need to be able to keep track of all of the sprites we have. Add the following fields to the top of the class declaration:

protected ArrayList<CCSprite> _targets;
protected ArrayList<CCSprite> _projectiles;

You’ll need to instantiate the arrays near the top of the constructor:

_targets = new ArrayList<CCSprite>();
_projectiles = new ArrayList<CCSprite>();

Now add the following to the addTarget() method just below the addChild(target) line:

target.setTag(1);
_targets.add(target);

In the ccTouchesEnded method add the following just below the addChild(projectile) line:

projectile.setTag(2);
_projectiles.add(projectile);

Finally update the spriteMoveFinished method to remove the sprite from the appropriate array:

if (sprite.getTag() == 1)
	_targets.remove(sprite);
else if (sprite.getTag() == 2)
	_projectiles.remove(sprite);

If you run the project now you shouldn’t notice any difference – but now we’re tracking all of our sprites! This gives us a great deal of extra power, and we shall use this power to add some collision detection. Add the following method to the class:

public void update(float dt)
{
	ArrayList<CCSprite> projectilesToDelete = new ArrayList<CCSprite>();

	for (CCSprite projectile : _projectiles)
	{
		CGRect projectileRect = CGRect.make(projectile.getPosition().x - (projectile.getContentSize().width / 2.0f),
											projectile.getPosition().y - (projectile.getContentSize().height / 2.0f),
											projectile.getContentSize().width,
											projectile.getContentSize().height);

		ArrayList<CCSprite> targetsToDelete = new ArrayList<CCSprite>();

		for (CCSprite target : _targets)
		{
			CGRect targetRect = CGRect.make(target.getPosition().x - (target.getContentSize().width),
											target.getPosition().y - (target.getContentSize().height),
											target.getContentSize().width,
											target.getContentSize().height);

			if (CGRect.intersects(projectileRect, targetRect))
				targetsToDelete.add(target);
		}

		for (CCSprite target : targetsToDelete)
		{
			_targets.remove(target);
			removeChild(target, true);
		}

		if (targetsToDelete.size() > 0)
			projectilesToDelete.add(projectile);
	}

	for (CCSprite projectile : projectilesToDelete)
	{
		_projectiles.remove(projectile);
		removeChild(projectile, true);
	}
}

This is a brute-force approach to collision detection. Basically we iterate through all of the projectiles and targets, creating a rectangle for each and then checking if they intersect. If there is an intersection we remove the sprites from the scene and arrays. We use the ‘toDelete’ arrays since we can’t manipulate an array while we’re iterating through it in the manner we’ve chosen. Before the collision detection will work, we need to schedule the method to be called every frame. Add the following line at the bottom of the constructor:

this.schedule("update");

Finishing Touches

We’re pretty close to a fully working game now (albeit a simple one!). All games have sound effects of some sort, and this one is no exception! First we should talk about the audio formats Android supports, since Cocos2D can’t do anything about the supported audio formats on the platform it’s running on. The current port of Cocos2D on Android doesn’t contain a full sound engine yet, certainly not on par with CocosDenshion offered on the iPhone. For this reason we’ll use basic wav files for this tutorial. We’ll also add some additional code logic so you can win/lose.

First you’ll need to get some audio for the background music and a sound effect for the shurikens. You can source your own, or download the wav version of the background music, and pew pew sound effect from Ray Wenderlich’s tutorial. Put the wav files in the res/raw folder of your project.

In the constructor add the following code after the addChild(player) line:

Context context = CCDirector.sharedDirector().getActivity();
SoundEngine.sharedEngine().preloadEffect(context, R.raw.pew_pew_lei);
SoundEngine.sharedEngine().playSound(context, R.raw.background_music_aac, true);

Next in the ccTouchesEnded method add the following code:

Context context = CCDirector.sharedDirector().getActivity();
SoundEngine.sharedEngine().playEffect(context, R.raw.pew_pew_lei);

Now we need to create a win/lose scene. Add a new class with the name ‘GameOverLayer’, have it inherit from CCColorLayer. Use the following code for the new class:

public class GameOverLayer extends CCColorLayer
{
	protected CCLabel _label;

	public static CCScene scene(String message)
	{
		CCScene scene = CCScene.node();
		GameOverLayer layer = new GameOverLayer(ccColor4B.ccc4(255, 255, 255, 255));

		layer.getLabel().setString(message);

		scene.addChild(layer);

		return scene;
	}

	public CCLabel getLabel()
	{
		return _label;
	}

	protected GameOverLayer(ccColor4B color)
	{
		super(color);

		this.setIsTouchEnabled(true);

		CGSize winSize = CCDirector.sharedDirector().displaySize();

		_label = CCLabel.makeLabel("Won't See Me", "DroidSans", 32);
		_label.setColor(ccColor3B.ccBLACK);
		_label.setPosition(winSize.width / 2.0f, winSize.height / 2.0f);
		addChild(_label);

		this.runAction(CCSequence.actions(CCDelayTime.action(3.0f), CCCallFunc.action(this, "gameOverDone")));
	}

	public void gameOverDone()
	{
		CCDirector.sharedDirector().replaceScene(GameLayer.scene());
	}

	@Override
	public boolean ccTouchesEnded(MotionEvent event)
	{
		gameOverDone();

		return true;
	}
}

Now we need to add some logic to the GameLayer to trigger the game over scene. Add the following field to the top of the GameLayer class:

protected int _projectilesDestroyed;

In the constructor, just after you initialise the arrays add the following line:

_projectilesDestroyed = 0;

In the update method, just after removeChild(projectile, true) add the following code:

if (++_projectilesDestroyed > 30)
{
	_projectilesDestroyed = 0;
	CCDirector.sharedDirector().replaceScene(GameOverLayer.scene("You Win!"));
}

Update the if statement in spriteMoveFinished to the following:

if (sprite.getTag() == 1)
{
	_targets.remove(sprite);

	_projectilesDestroyed = 0;
	CCDirector.sharedDirector().replaceScene(GameOverLayer.scene("You Lose, boo"));
}
else if (sprite.getTag() == 2)
	_projectiles.remove(sprite);

Go ahead and give the game a play!

Gimme The Code!

You can download the full source code here.

Where To Now?

This project provides a good basis for further development. Some possible changes were mentioned as part of the tutorial, others are limited only by your imagination! Check out the test projects that come with the source of Cocos2D, see if you can integrate some of them into the project here.

Alternatively, you can follow the next tutorial in the series here.

Or maybe follow the tutorial on audio to learn more about background music & sound effects in Cocos2D for Android.

This is my first tutorial, and I hope you’ve enjoyed it!
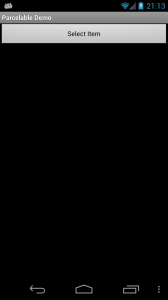
Posted by Dan in Java, Programming, Tutorials, 131 comments