If you want to use mouse buttons #4 and #5 to go forward / backward in Mac OS X out of the box you’re going to be disappointed, and end up with just a scroll icon appearing.
There’s a few utilities you can use to fix this:
- Microsoft IntelliPoint – Only works with MS mice, doesn’t seem to work in Mountain Lion
- Logitech Control Centre – Only works with Logitech mice, apparently quite buggy now
- Razer software – not tested, will only work with Razer mice anyway
- Steermouse – Getting increasingly flakey with new OS X versions
- USB Overdrive – Not been in development since Snow Leopard, doesn’t seem to work 100% of the time anymore
- ControllerMate – Works!
ControllerMate to the rescue!
ControllerMate is actively developed & maintained, and offers an incredible amount of customisation for all HID peripherals. So not only will it sort out your back / forward issue, it’ll also solve the mouse acceleration issue – if that’s a problem for you. This guide will cover back / forward only, though.
1. First download and install ControllerMate.
2. Reboot and launch ControllerMate.
You’ll now be presented with a scary as hell screen that looks like you’re laying out circuit boards, rather than fixing a major limitation in OS X.
The diagrams in place on first launch are a kind of mini tutorial, telling you how you can do a few things. You can either leave them in place for future reference, or delete them to clean up the view.
The first step is to create a new Programming Group:
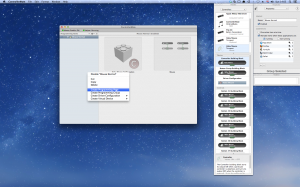
3. To do this, right-click in the sidebar and select ‘Create Programming Group”.
4. Afterwards, right-click on the new group, and select ‘Create Programming Page’.
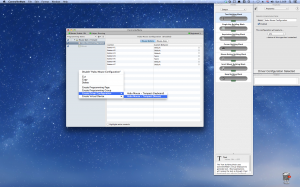
5. Now right-click on the new group again, point to ‘Create Driver Configuration’, then select your mouse.
You can name your new items in the ‘Inspector’ window to the right.
6. Click on your programming page to display an empty grid.
7. In the ‘Palette’ to the right, select ‘Controllers’ from the drop down list. Find your mouse, then drag button #4, and button #5 to the grid.
8. Now select ‘Output’ from the drop down list in the Palette. Drag an instance of ‘Keystrokes Building Block’ underneath each of your mouse button instances.
You should now have something like this (without the green lines):
9. Link the blocks, by dragging from the button’s green hotspot, to the action’s green hotspot. Just as in the screenshot above.
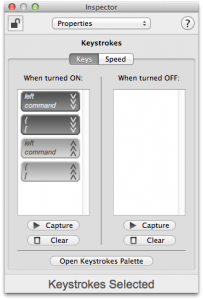
10. Click on the keystroke block for button #4. In the Inspector window, click on the ‘Keys’ tab, then click on ‘Capture’. Enter they key combination for ‘Back’ (Command + [), then press stop.
If the command doesn’t appear correctly, click on ‘Open Keystrokes Palette’, and drag the buttons from the virtual keyboard to the window, as seen above.
11. Do the same for button #5’s keystroke block, but this time use the command for forward (Command + ]).
12. Click on the driver configuration item in the sidebar, and set buttons #4 and #5 to ‘None’.
You’re now done! Backward / Forward should work immediately in all apps.
But now my VM / Other App doesn’t respond to buttons #4 and #5!
This is a problem as a result of disabling the buttons and remapping them to forward / back. Fortunately there is a solution!
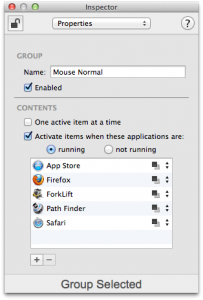
- Click on the group in the sidebar
- In the ‘Inspector’ window, check ‘Activate items when these applications are:’, select ‘running’
- Add all of the apps that you want to add back / forward support to the list.
Now the mouse will work in all applications. If an app supports backward / forward, remember to add it to the list above.
More VM
Not all VMs support the extra mouse buttons, even if they’re receiving them. If you’re having trouble, try following my follow-up guide for Parallels.


