Programming

Using the Keychain in MonoMac

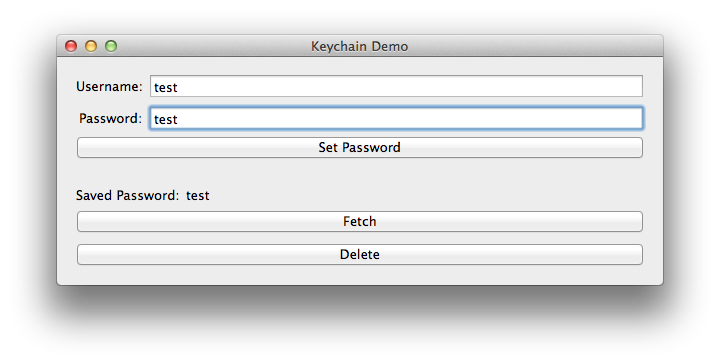
The keychain is a great feature in OS X, allowing you to store passwords securely. In this tutorial I’ll outline how to store passwords in the keychain so your apps don’t have to worry about securely storing the passwords themselves.

Before I start, you can skip straight to the code on github here.

A few pointers

The MonoMac binding of the OS X keychain is somewhat basic at this moment in time, however it should be enough for basic password storage. OS X supports multiple keychains, as well as multiple types of passwords. At the moment the MonoMac bindings limit you to the system (well, user’s login) keychain, and only the ‘Internet Password’ keychain type.

Additionally you’ll want to sign your app to ensure your passwords are uniquely identified, without signing I’ve noticed that other MonoMac apps authored by myself seem to conflict with each other.

Relevant Classes

We store keychain records in a class of SecRecord, while the SecKeyChain static class handles the interaction with the keychain itself. When searching for records, you’ll fill in a SecRecord with the fields you need to match, then get SecKeyChain to return a matching record. You need to be careful not to try and insert duplicate records, if you do it’ll be difficult to pull out the record you want – it’s undefined which one you’ll get. This can lead to odd bugs where one second you get the correct password, and the next you get the wrong one.

The password for Internet Passwords is stored in the ValueData property, this is of NSData type rather than the string you’re probably expecting.

Selecting

To fetch a record, you need to provide a record with the fields you want to filter by set. At a minimum you’ll want to specify the service and account (username):

var searchRecord = new SecRecord(SecKind.InternetPassword)
{
    Service = ServiceName,
    Account = username
};

SecStatusCode code;
var data = SecKeyChain.QueryAsRecord(searchRecord, out code);

if (code == SecStatusCode.Success)
    return data;
else
    return null;

This code will return a matching record, or NULL if none are found. If more than one record matches your search criteria, you’ll get a random record. For this reason make sure you never accidentally insert duplicate records, or you’ll get unpredictable behaviour in your app. Remember, the search record you specify will be used as the search criteria – the filled in fields will be used for the search.

To get the password from the record use the following code:

password = NSString.FromData(record.ValueData, NSStringEncoding.UTF8);

Remember, the ValueData property is NSData, not a string. If MonoMac allows you to use a record type of ‘Generic Password’, the password will be stored in the Generic property rather than ValueData. Generic is also an NSData type.

Inserting

Inserting a password involves filling out a SecRecord, and then calling Add() on SecKeyChain:

var record = new SecRecord(SecKind.InternetPassword)
{
    Service = ServiceName,
    Label = ServiceName,
    Account = username,
    ValueData = NSData.FromString(password)
};

SecKeyChain.Add(record);

However, if you remember from earlier – you never want to insert a record without checking for an existing one because you’ll risk adding a duplicate record. Once inserted, you’ll see your password in the keychain utlity:

For code on how to perform a check and then update / insert as necessary, check the sample code.

Updating

Updating involves sending in the existing record (or at least one that’ll uniquely identify the record you’re after), and a new record to replace it:

record.ValueData = NSData.FromString(password);
SecKeyChain.Update(searchRecord, record);

The first parameter is handled in exactly the same was as when querying for an existing record, the second parameter is your newly updated record.

Deleting

Deleting is remarkably similar to updating, except you only send in your search record:

var searchRecord = new SecRecord(SecKind.InternetPassword)
{
    Service = ServiceName,
    Account = username
};

SecKeyChain.Remove(searchRecord);

Finishing Up

This guide has demonstrated how to interact with the OS X keychain using MonoMac. Make sure to check out the sample project for a simple utility class that wraps up all of the necessary functionality with a friendly interface.
Posted by Dan in C#, Mac, Tutorials, 2 comments

iPhone Glyphs from ‘Apple Symbols’ in Lion / Mountain Lion

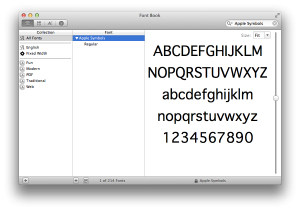
The Apple Symbols font provides a lot of the symbols used in iOS, however since Lion it’s been harder to get at them. Here is how to use them if you’re on Lion or above:

First open Font Book and open up the Apple Symbols font.

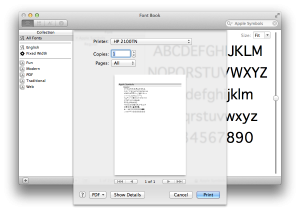
Next, bring up the print dialog (CMD + P).

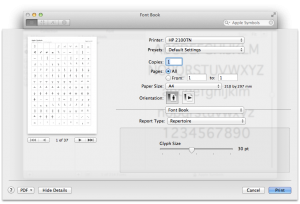
Now click on ‘Show Details’

Change the Report Type to ‘Repetoire’. Next change the glyph size to something larger, I find 30pt about right most of the time.

Now click on the PDF button in the bottom left, and save the PDF somewhere.

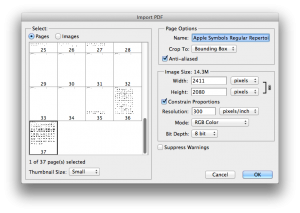
Next, start up Photoshop and drag the PDF into the stage.

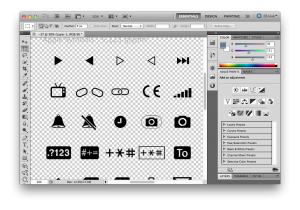
You want the last couple of pages for the iOS glyphs. Make sure the resolution is high enough, I like to go for a dpi of 300. Click on OK and you should be presented with the glyphs nicely anti-aliased with a transparent background:

Glyps are ready to go!

Posted by Dan in Guides, iOS, Programming, Tutorials, 0 comments

MonoMac “Exception has been thrown by the target of an invocation” when accessing outlet

If you’re getting a ‘Exception has been thrown by the target of an invocation’ exception when trying to access an outlet variable, it could be the outlet has been hooked up wrong. The outlets must be hooked up to the File Owner, which is most likely to be your controller class. Xcode presented the view rather than the controller in the editor panel, so I had hooked up all of my outlets to the view instead of the controller by accident.

Posted by Dan in Mac, 0 comments

Cocoa Popup window in the Status bar – MonoMac Port

Vadim Shpakovski way back on July 2011 released code for a popup window in the status bar, and now in August 2012 I have ported it over to MonoMac with a few tweaks! If you don’t care about the guide below, you can access the source at Github.

The implementation is largely the same as used in Vadim’s implementation, with a few tweaks to make it simpler, more .NET-like and more extensible. There’s still more work that needs to be done to make it truly modular architecture-wise, but I’ve made the classes themselves easily extensible with clear extension points.

High Level Overview

The entry point is the StatusPanelController, this controller creates the icon in the status bar. It takes in a controller that inherits from PanelController so that you can create your own custom views if necessary. When the user clicks on the icon, the controller will call OpenPanel() and ClosePanel() in the PanelController.

The PanelController is the controller for the panel that opens – it’s responsible for all rendering.

BackgroundView is the background for the panel we display, you can think of it as the panel itself. It renders the arrow, border, and background. For this reason the panel you use must have a BackgroundView, additionally the panel itself should be effectively non-styled, with all standard window chrome removed.

That’s basically it!

BackgroundView

BackgroundView is a special view that represents the popup panel. At the top of the source file are various constants for controlling how the view should be rendered. ArrowX is necessary so that we know where the middle of the status bar icon is. The arrow will centre itself on this point.

To render the view we override DrawRect, and provide our own custom drawing using an NSBezierPath to do most of the work. Take note that the coords .NET use are reversed on the Y axis, .NET’s origin is in the top-left, while OS X’s origin is in the bottom left.

PanelController (and a little note on MonoMac Animation)

PanelController is the most substantial class in the entire project. This controller is responsible for the display of the panel itself, this means it needs to handle the animation of the panel, as well as updating the BackgroundView with the position of the status icon, should the window be resized. HandleWindowDidResize handles the arrow position, updating the BackgroundView whenever the panel is resized. Meanwhile we have two events, WillClose and DidResignKey that we use to know when to close the panel. We don’t want the panel just disappearing, we want a nice smooth animation!

OpenPanel() is responsible for displaying the panel in a smooth way. First of all it works out the position the panel needs to be, this is based on the icon position. Next we set up the panel for display by ensuring critical state, and adding a teeny bit of a debug Easter egg. If you press shift, or shift + option, you slow down the animation, and optionally output debug information relating to the upcoming display.

Finally we animate the panel into view. Note that we cast the Animator property of the window, this is because by default the Animator property is of type NSObject. The Animator is actually a proxy for the full object, so we can just cast it to the ‘real’ type, and set our new post-animation properties. We then finish our animations, and let OS X do the rest!

ClosePanel() is the opposite of OpenPanel() and just animates the panel away.

Panel

Panel is a very slightly customised implementation of NSPanel. We just add an extra property so that we can use controls in the panel that require the keyboard, such as text fields.

StatusItemView

This is the view that will be displayed in the status bar. It’s fairly self-explanatory, with different images depending on the state of the button. There’s a GlobalRect property so that we can locate the icon in the screen and position the panel.

For rendering we override DrawRect, and do it largely ourselves. We first draw the background into the view, optionally highlighted. Next we draw the requisite image (the icon) in the centre of the view. We use an updated method call over the one used by Vadim because the original has been deprecated – it’s not even available in MonoMac!

Finally we track the MouseDown and MouseUp events, rather than just MouseUp. A ‘click’ is considered when the user both mouses down and up, in the same view. If the user does this, we fire the StatusItemClicked event.

StatusPanelController

Finally we have the controller that actually brings it all together. The controller could do with a little more work to make it genuinely re-usable, since it uses hard-coded values for the images, as well as the view used for the status icon. Fortunately re-factoring these out into dependencies would be fairly trivial.

At construction we create all of our required controllers and views, this creates the icon in the status bar.

We hook into the clicked event from StatusItemView, and toggle the panel as neccesary.

Finally we implement IDisposable so that we never leave an icon in the status bar by accident – that would be very bad! We also have a finalizer so that no matter what, the icon will end up removed from the status bar when the controller is garbage collected.

Posted by Dan in Mac, Programming, 6 comments

Running multiple instances of MonoDevelop on Mac

By default OS X will only let you run a single instance of any app, which is OK if the app is designed with multiple windows & a single instance in mind. MonoDevelop is a different beast, and sooner or later you’re going to want to run at least 2 instances of it, here’s how:

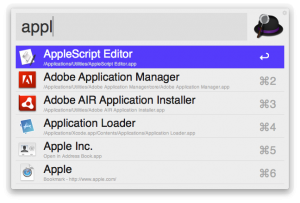
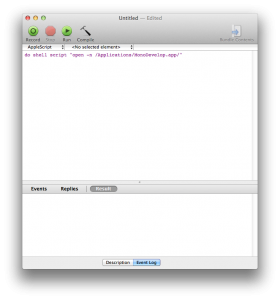
First run the AppleScript editor, and enter the following code:

do shell script "open -n /Applications/MonoDevelop.app/"

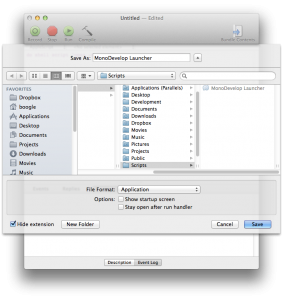
Now save the script somewhere easily accessible, make sure to set the ‘File Format’ to ‘Application’. I chose the name ‘MonoDevelop Launcher’:

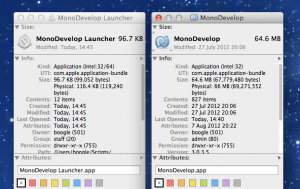
Now the only problem left is the icon, it’s most likely the AppleScript icon, rather than the MonoDevelop one:

Use ‘Get Info’ to get the info for both your new launcher, and MonoDevelop. Click on the icon for MonoDevelop and press CMD+C. Now click on the icon for your script, and press CMD+V. The icon should now be correct:

References: Based on answer by ‘Subfuzion’ as StackOverflow

Posted by Dan in Guides, Mac, Programming, 0 comments

wait_fences: failed to receive reply: 10004003

This error is cryptic and can have any number of causes, but the most common are:

  • Performing animations when the view isn’t on screen (use viewDidAppear, not viewWillAppear)
  • Failing to call super when overriding a method
  • Calling something in the UI from a thread other than the main UI one
  • Calling UI methods that dramatically change the view (such as presenting / hiding main views) too quickly
  • Calling UI methods before an alert has been dismissed

Basically the error is related to the UI. The message appearing in the output may not reflect the code that actually triggered it – so to debug you need to isolate the code that’s causing it. Your first port of call should be callbacks from alerts, or other popups. For me it was the UIImagePicker, I fixed it like so:

protected void FinishedPickingMedia(object sender, UIImagePickerMediaPickedEventArgs e)
{
    var picker = sender as UIImagePickerController;

    if (picker == null)
        return;

    picker.DismissModalViewControllerAnimated(true);
    if (picker == _picker)
	_picker = null;

    // Work with the image here

    // Bug fix for fences issue
    BeginInvokeOnMainThread(() =>
    {
        // CODE THAT INTERACTS WITH THE UI HERE
    });
}

The pertinent code is the BeginInvokeOnMainThread block, this is fixing the wait_fences issue. It looks like the callback method isn’t being executed on the UI thread. I’m not sure if this is an iOS SDK thing, or a quirk added by MonoTouch. It could also be that the picker is still animating away when I start tweaking the UI, causing the issue. For example messing about with the UI in the Clicked event of a UIAlertView can sometimes cause minor issues, moving the code to the Dismissed event fixes the issues completely.

Posted by Dan in C#, iOS, MonoTouch, 0 comments

Using UIGestureRecognizer in MonoTouch

Gesture Recognisers are a great feature added in iOS 3.2 (ages ago!), and using them in MonoTouch couldn’t be simpler. I’ll skip over a discussion on how they work, if you want more info on the recognisers themselves, be sure to check out the Apple documentation.

Selectors

UIGestureRecognizer instances use selectors to call back methods in your class. Selectors are supported in MonoTouch, you just need to do a little more work:

[Export("ViewTapSelector")]
protected void OnViewTapped(UIGestureRecognizer sender)
{
    MessageLabel.Text = "View Tapped";
}

Essentially you need to create a method, then mark it for export. This tells the MonoTouch compiler to make the method callable by ObjC code. Make sure the containing class is decorated with the Register attribute (ViewControllers are automatically registered).

First Recogniser

Setting up a UIGestureRecognizer is very easy:

var tapRecogniser = new UITapGestureRecognizer(this, new MonoTouch.ObjCRuntime.Selector("ViewTapSelector"));
View.AddGestureRecognizer(tapRecogniser);

This creates a new recogniser, with a callback and assigns it to the root view for the controller. You don’t need to worry about garbage collection since the view will retain the recogniser. You can access all of the recognisers for a view by using the GestureRecognizers property.

That’s it!

Surprisingly that’s all there is to it! You can download an example project here, or just view the code snippet below to flesh out the principles:

Sample Code

private void SetupGestureRecognisers()
{
    var tapRecogniser = new UITapGestureRecognizer(this, new MonoTouch.ObjCRuntime.Selector("ViewTapSelector"));
    View.AddGestureRecognizer(tapRecogniser);

    var doubleTapRecogniser = new UITapGestureRecognizer(this, new MonoTouch.ObjCRuntime.Selector("ViewDoubleTapSelector"));
    doubleTapRecogniser.NumberOfTapsRequired = 3;
    View.AddGestureRecognizer(doubleTapRecogniser);

    var longPressRecogniser = new UILongPressGestureRecognizer(this, new MonoTouch.ObjCRuntime.Selector("LongPressSelector"));
    View.AddGestureRecognizer(longPressRecogniser);

    var panRecogniser = new UIPanGestureRecognizer(this, new MonoTouch.ObjCRuntime.Selector("LabelPanSelector"));
    DragLabel.AddGestureRecognizer(panRecogniser);
}

[Export("ViewTapSelector")]
protected void OnViewTapped(UIGestureRecognizer sender)
{
    MessageLabel.Text = "View Tapped";
}

[Export("ViewDoubleTapSelector")]
protected void OnViewDoubleTapped(UIGestureRecognizer sender)
{
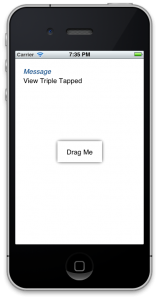
    MessageLabel.Text = "View Triple Tapped";
}

[Export("LongPressSelector")]
protected void OnLongPress(UIGestureRecognizer sender)
{
    MessageLabel.Text = "View Long Pressed";
}

[Export("LabelPanSelector")]
protected void OnLabelPan(UIGestureRecognizer sender)
{
    var panRecogniser = sender as UIPanGestureRecognizer;

    if (panRecogniser == null)
        return;

    switch (panRecogniser.State)
    {
        case UIGestureRecognizerState.Began:
            _originalPosition = DragLabel.Frame.Location;
            break;

        case UIGestureRecognizerState.Cancelled:
        case UIGestureRecognizerState.Failed:
            DragLabel.Frame = new RectangleF(_originalPosition, DragLabel.Frame.Size);
            break;

        case UIGestureRecognizerState.Changed:
            var movement = panRecogniser.TranslationInView(View);
            var newPosition = new PointF(movement.X + _originalPosition.X, movement.Y + _originalPosition.Y);
            DragLabel.Frame = new RectangleF(newPosition, DragLabel.Frame.Size);
            break;
    }
}
Posted by Dan in C#, iOS, MonoTouch, Tutorials, 4 comments

Ninject & Constructor Arguments

I had an issue where I needed to created an instance of a class with a custom constructor argument using Ninject 2. I initially tried something like this:

return IoC.Get<CountryChecklist>(new Parameter("selectedItems", countries, false)).RenderCountryChecklist(model);

However, this is unreliable. The solution is fairly simple, use a ConstructorArgument instead of Parameter:

return IoC.Get<CountryChecklist>(new ConstructorArgument("selectedItems", countries)).RenderCountryChecklist(model);
Posted by Dan in C#, 0 comments

NSubstitute – Falling off a log easy mocking

Call me crazy, but I like my programming to be easy as pie. If it’s complicated or I have to jump through some hoops then something is decidedly wrong.

This is where NSubstitute comes in – it makes mocking dead easy, and the great thing is it integrates really well with Ninject for really easy unit testing with IoC. The NSubstitute home page has a great example of how the mocks work:

//Create:
var calculator = Substitute.For<ICalculator>();

//Set a return value:
calculator.Add(1, 2).Returns(3);
Assert.AreEqual(3, calculator.Add(1, 2));

//Check received calls:
calculator.Received().Add(1, Arg.Any<int>());
calculator.DidNotReceive().Add(2, 2);

//Raise events
calculator.PoweringUp += Raise.Event();

And when something goes wrong, it’s pretty succinct with the error messages:

CallNotReceivedException : Expected to receive call:
    Add(1, 2)
Actually received (non-matching arguments indicated with '*' characters):
    Add(*4*, *7*)
    Add(1, *5*)

Ahhh I do love a nice simple API with fluent support.

Posted by Dan in C#, Programming, 0 comments

Network Order and String Encoding

As a follow-on from my post on floating point values and endian swapping, I thought I’d write an article on strings. String encoding is fairly complicated due to the fact that we’re now living in a large global community – ASCII simply won’t cut it any more. On the positive side, if you only need ASCII you can send it across the network as-is. Since it’s only a single byte, there is no worry about endianness.

The problem is when dealing with string encoding that can go over a single byte, so-called multi-byte encoding. This is very likely if you need to support languages other than English. Rather than worry about endianness, BOMs, and other character encoding headaches; may I humbly suggest you try UTF-8. UTF-8 is completely backwards-compatible with ASCII, yet supports the entire unicode character set. It uses the minimum number of bytes for each character (good for saving bandwidth) and is inherently immune to endian issues (for for your sanity). In C# encoding to UTF-8 couldn’t be simpler:

Encoding.UTF8.GetBytes(myString);

The only issue with UTF-8 is that you can’t just say that the string is X number of bytes long based on the number of characters. Characters can require anywhere from 1 byte to 6 bytes. The simplest solution to this problem is to encode the string into a byte array, then prefix with an int that contains the length of the entire string in bytes. When reading the string back in, you can read in the first int then read however many bytes the int specifies.

Posted by Dan in C#, Guides, 0 comments